Elaborare richieste
Select whether you are using the Legacy interface or the Modernized interface in Tipasa.
Process New For Review requests
Follow the instructions below to process New for Review requests.
To process New for Review requests:
- From the Borrowing Requests category, click New For Review. The initial categories of Not Reviewed and Reviewed are listed.
- Requests under Not Reviewed are requests that have not been seen by your staff. These requests originate from a source outside of your system.
- Requests with a status of Reviewed have been saved by your staff, using the Save For Review feature.
- Click the request ID or Title to display a request.
- Review and confirm the information in the Request Details section.
- If the citation needs to be verified, click the magnifying glass icon, next to the Title, Author or standard number fields, to search WorldCat via Discover Items. A contextual search is launched for the terms selected, and the Results screen appears.
- Patrons can submit a request using the PMID. If the request contains a PMID, staff can use the magnifying glass to retrieve citation information from PubMed. If the citation information is correct, select Apply and Save to apply the PubMed citation information to the request.
- A My library catalog link will redirect to the library's online catalog URL as set up in the Online Catalog section of the WorldCat Registry module in the OCLC Service Configuration. The following must be entered in the Online Catalog section in order for the My library catalog link to resolve: Online Catalog Direct to ISBN, Online Catalog Direct to ISSN, or Online Catalog Direct to OCLC Number.
- The My library catalog link can take 24 hours to populate.
- Refer to WorldCat Registry, Configure links to your online catalog.
- On the Results screen, you have two options:
- Click the item you want to request. Bibliographic information appears. If applicable, click Apply data, OR
- Fare clic su un collegamento al posseduto o utilizzare un percorso di posseduto personalizzato o un gruppo con profilo OCLC. Nella schermata Posseduti, aggiungere i prestatori alla sequenza delle biblioteche a cui far richiesta, quindi fare clic su Aggiorna richiesta. Per ulteriori informazioni, vedere la schermata Posseduti.
Note: The citation information for copy requests will display at the top of the Holdings screen and will remain as you scroll through potential lenders. Compare the lenders holding information in the Holdings column to the citation information of the copy request to be sure the lender has the exact volume needed to fulfill the request.
- The request form appears, and the bibliographic data is updated.
- Apply your constant data, and click Send Request.
- A confirmation message appears and the request is updated.
Corrispondenza bibliografica
La corrispondenza bibliografica aiuta a garantire che l'utente della biblioteca riceva l'elemento che si aspetta. Quando la richiesta di un utente include solo informazioni bibliografiche parziali, il sistema utilizza le informazioni fornite e applica una serie di regole per identificare l'elemento con la corrispondenza migliore. il record con la corrispondenza migliore è catalogato completamente e correttamente in WorldCat, è ampiamente posseduto dalle biblioteche e corrisponde esattamente all'elemento richiesto dall'utente. Una volta identificato l'elemento migliore, il sistema aggiunge o aggiorna automaticamente le informazioni bibliografiche nella richiesta.
La corrispondenza bibliografica richiede almeno uno dei seguenti: numero ISSN, ISBN o OCLC .
- Se viene incluso un ISSN , il sistema lo utilizza per identificare il miglior record WorldCat .
- Se un ISSN non è incluso, il sistema cerca un numero OCLC . Se è presente un numero OCLC , il sistema lo utilizza per identificare il record migliore.
- Se non viene incluso alcun numero ISSN o OCLC , il sistema cerca un ISBN. Se è presente un ISBN , il sistema lo utilizza per identificare il record migliore.
- Se non viene incluso alcun numero ISSN/ ISBN o OCLC , il sistema invia la richiesta alla revisione del personale.
Quando viene fornito un ISSN , è necessario un controllo di corrispondenza del titolo del 30%. Ad esempio, un valore come "J Clin Psych" corrisponderebbe a Journal of Clinical Psychology ma non a Journal of Business Economics.
Holdings screen
Display holdings

To display holdings, use one of the following options:
- Click State Holdings, Regional Holdings, or All Holdings.
- State Holdings: Holdings within your state displayed in alphabetical order by institution name.
- Regional Holdings: Holdings from states or provinces that border your state. Bodies of water are not considered when determining borders. Your institution's state or province is listed first, followed by other states or provinces in alphabetical order.
- All Holdings: Your institution's state or province is listed first, followed by other states or provinces in alphabetical order.
Note: A line separates holdings for each state and province. Within each state or province, holdings are listed alphabetically by institution name
- To display holdings from a Custom Holdings Path or OCLC profiled group, select that option from the Filter by drop-down list. Click Go to see results based on the selected filters. See Filter holdings to build a lender string for more information.
Filter holdings to build a lender string
When viewing holdings for an item, you can filter the list of holdings to assist in building a lender string. If you select both a Custom Holdings Path and a year or volume, the lender string will automatically populate with libraries from the first section of the display.
Filter by Custom Holdings Path
You can filter holdings by a custom holdings path when the item requested is a book or other monograph as well as for copy requests where:
- The patron did not specify the year or volume.
- The holding libraries do not specify their year or volume-level holdings.
- Select a custom holdings path from the drop-down list.
- Click Go. The results list identifies the group of the holding library in the Group column. Groups are also delineated by a heavy gray line.
- If you select both a Custom Holdings Path and a year or volume, the lender string will automatically populate with libraries from the first section of the display.
- Click Yes in the Supplier column to add lenders to the string. You can add up to 15 lenders from the results list.
Note: Custom Holdings Paths which contain Profiled Groups can only be completely applied via automations configured in the Automated Request Manager. If the Custom Holdings Path has been manually applied, a warning appears. To build a partial lender string from the current Custom Holdings Path that does not include symbols from the Profiled Group, click OK. Click Cancel to close this window and either manually route this request to automation or select a different Custom Holdings Path. See Custom Holdings Path for more information.
Filter with Year and Volume
When viewing holdings for a journal or other periodical, you can filter the list of holdings by year or year and volume. This data is populated from the lending library's local holdings record or knowledge base holdings.
- Enter a year in the Year field
Or
Enter a year in the Year field and a volume in the Volume field. - Fare clic su Vai.
- The results list is split into three sections, delineated by a heavy gray horizontal line:
- Libraries that hold the year/volume
- Libraries where local holdings are not available
- Libraries that do not hold the year/volume
- If you select both a Custom Holdings Path and a year or volume, the lender string will automatically populate with libraries from the first section of the display.
- The results list is split into three sections, delineated by a heavy gray horizontal line:
- Click Yes in the Supplier column to add lenders to the string. You can add up to 15 lenders from the results list. A lender string will be added based on libraries that hold the year/volume.
Holdings screen view
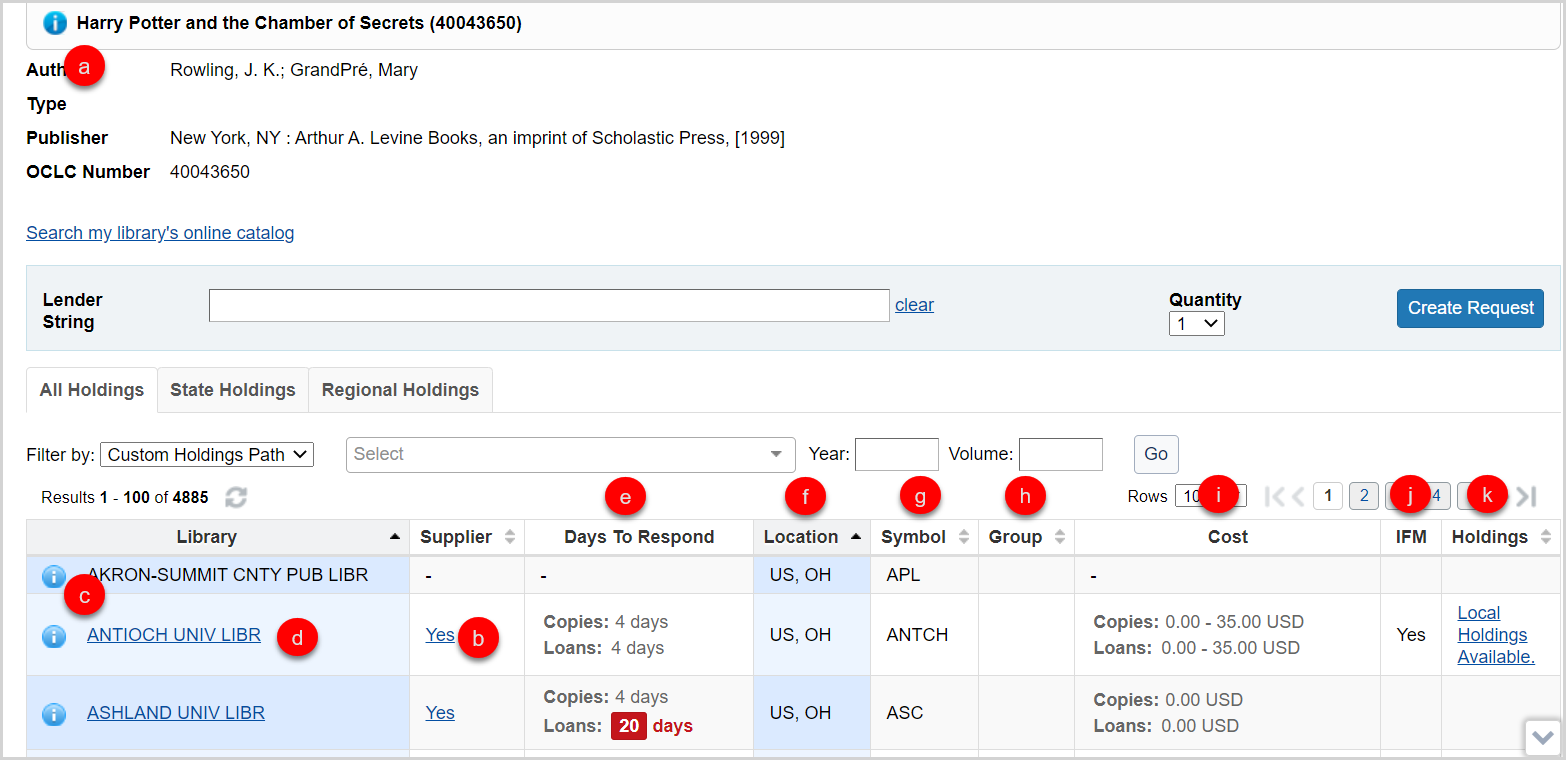
On the Holdings screen, you also have several options:
- Passare il mouse sull'icona informativa (
 ) accanto al titolo dell'elemento richiesto per visualizzare brevi dati bibliografici.
 - Click Yes (or anywhere in the Yes box) in the Supplier column to add a Supplier to your lender string.
- Once a lender has been added to the lender string, the hyperlink in the Supplier column will no longer be clickable. If a lender is removed from the lender string, your ability to click on Yes in the Supplier column is restored. This selection status will be maintained as you move through all holdings lists.
- Yes displays if the library is a current supplier. If they are not, a dash displays in the Supplier column.
- Click the information icon (
 ) next to the library’s name to go the OCLC Policies Directory and confirm a lender’s policies. The OCLC Policies Directory for the lender will open in a new window.
- For information on deflection basics and examples, see Deflections.
- Click the library name to go to the library’s online catalog.
- This link is maintained in the WorldCat registry. For information about configuring your OPAC to display to other libraries and provide deep links to a specific OCLC number or other identifiers, see WorldCat Registry, Configure links to your online catalog.
- The following must be entered in the Online Catalog section in order for the OPAC link to resolve: Online Catalog Direct to ISBN, Online Catalog Direct to ISSN, or Online Catalog Direct to OCLC Number.
- This link is maintained in the WorldCat registry. For information about configuring your OPAC to display to other libraries and provide deep links to a specific OCLC number or other identifiers, see WorldCat Registry, Configure links to your online catalog.
- View suppliers’ Days To Respond. The Days to Respond indicates the number o fdays the library needs to respond to copy and loan requests.
- If an item is Held by your library, you will see the
 icon at the top of the Holdings screen, indicating that your library has a holding set on that item in WorldCat. You will also see this icon on the top of the Request work form.
- If an item is Held by your library, you will see the
- View the suppliers Location, which displays abbreviations for the country, and state or provence.
- La colonna Simbolo mostra l'identificativo OCLC dell'istituto.
- La colonna Gruppo viene compilata quando si filtra in base a un percorso di posseduto personalizzato per mostrare quale dei gruppi di posseduto personalizzato contiene un potenziale prestatore.
- La colonna Costo indica quanto addebitato dalla biblioteca per copie e prestiti immessi in OCLC Policies Directory.
- The IFM column will indicate Yes if the library participates in Interlibrary Loan Fee Management.
- View suppliers' Holdings information. This data is populated from the lending library's local holdings record or knowledge base holdings. If the information has been provided by the library, the column will display Local holdings available or a summary statement of specific volumes and issues held.
- Click on the text in the column to view additional holdings details.
- The resulting Holdings screen will list the Collection and Coverage for the knowledge base holding.
- Local Holdings Records will list the Format, Location, and Holding information.
- The coverage information displayed in the Holdings information sometimes comes from the embargo_info field of the KBART file in the WorldCat knowledge base. See Embargo and moving wall of coverage for more information.
The citation information for copy requests will display at the top of the Holdings screen and will remain as you scroll through potential lenders. Compare the lenders holding information in the Holdings column to the citation information of the copy request to be sure the lender has the exact volume needed to fulfill the request.
- Click on the text in the column to view additional holdings details.
View Holdings details
If the information has been provided by the library, electronic serials display the exact coverage statement from the WorldCat knowledge base and a Local Holding Record (LHR) summary displays for print serials in the Holdings column.
Click on the summary text in the Holdings column to view additional details about the WorldCat knowledge base or LHR holdings for the title.
- The resulting Holdings detail screen will list the Collection and Coverage for the knowledge base holding.
- Le dichiarazioni di copertura vengono visualizzate nella colonna Posseduto per ogni singola collezione della knowledge base e non vengono deduplicate se il posseduto appare in più collezioni. Dopo aver fatto clic su una dichiarazione di copertura, la schermata dei dettagli del posseduto risultante elencherà il nome e la copertura di ogni collezione della knowledge base contenente il periodico.
- Local Holdings Records will list the Format, Location, and Holding information.
Note: The citation information for copy requests will display at the top of the Holdings screen and will remain as you scroll through potential lenders. Compare the lenders holding information in the Holdings column to the citation information of the copy request to be sure the lender has the exact volume needed to fulfill the request.
View local holdings and availability
If your library has enabled local holdings and availability, patron-initiated requests submitted through automation will display local holdings information for items held by your institution. See Automated Request Manager.
- If you are a WMS library, please see OPAC integration for more information about enabling this feature.
- If you are an Alma or Sierra library, please contact OCLC Support to discuss enabling this feature.
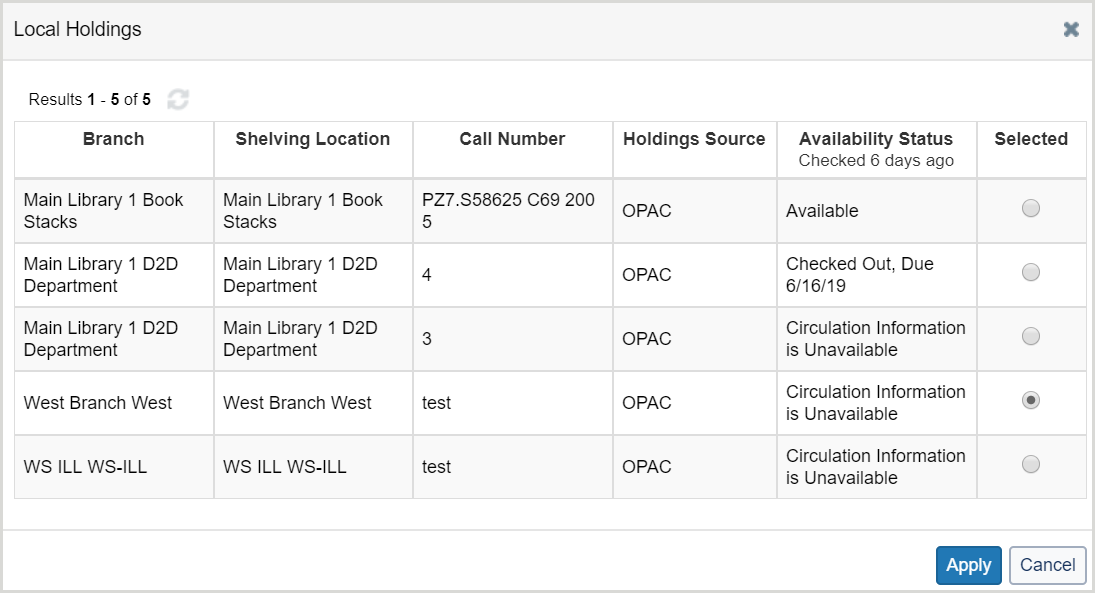
Single Holding
When a single holding is found, the Local ID and Local Holdings fields of the request are updated with the holdings information supplied by your OPAC. The Local Holdings fields include:
- Ramo
- Posizione della scaffalatura
- Collocazione
- Holdings Source
- Holdings Source will be listed as OPAC.
- Availability Status
- Per In prestito e Consegna documento, la ricerca avviene quando la richiesta passa attraverso l'automazione (che avviene automaticamente quando le richieste vengono effettuate dagli utenti tramite Il mio account). Vedere Gestione richieste automatizzata. Se è necessario controllare manualmente lo stato della disponibilità, fare clic su Cerca nel catalogo online della mia biblioteca.
Il campo ID locale viene compilato con le informazioni sulla sede, sulla posizione nella scaffalatura e sulla collocazione.
Multiple Holdings
When multiple holdings are returned by your OPAC, the View Local Holdings link will appear. The View Local Holdings screen will show each instance of holdings for the requested item.
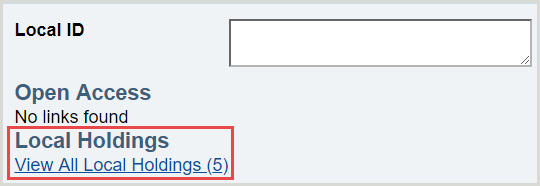
Select which holding to use and click the Apply button. The information for the selected holdings will appear in the Local ID and Local Holdings fields and will be saved with the request.
Process Open Access requests
From the borrowing request page, follow the instructions to process Open Access requests.
If your library has enabled Document Delivery (recommended):
- Click the Change Fulfillment Type drop-down at the top of the request page to Document Delivery.
- Select Open Access Link from the URL Type drop-down menu.
- Paste the URL into the URL Field.
- Click the Mark as Complete button to save and update the request.
- The link will be available to the patron in My Account.
- If your library has configured automated Document Delivery to Library Patron notifications and the patron has selected to receive email or text message notifications, the appropriate notification will be sent.
If your library has not configured automated notifications, you will need to manually send the notification before marking the request as complete.
- Lo stato della richiesta viene aggiornato come Chiusa (Fornita).
If your library has not enabled Document Delivery:
- Fare clic sul pulsante E-mail e selezionare il modello appropriato o compilare il modulo per inviare all'utente il collegamento Open Access per l'elemento richiesto.
- Aprire la richiesta e selezionare Open Access dal menu a discesa Modifica tipo di evasione per registrare l'adempimento dell'articolo. Viene visualizzato un messaggio di conferma e la richiesta viene aggiornata come Chiusa (Open Access).
È importante inviare per e-mail al mecenate il link all'accesso aperto all'articolo richiesto prima di fare clic su Accesso aperto, perché quando la richiesta viene aggiornata a Chiuso (Accesso aperto), le informazioni sul mecenate allegate alla richiesta vengono cancellate.
Requests filled via Open Access will be included in monthly statistical reporting.
Receive items (from In Transit status)
Renew item (from Received status)
Seguire le istruzioni seguenti per rinnovare un elemento della richiesta.
Per rinnovare un item:
- Nella categoria Richieste di prestito, fare clic su Ricevute.
- Fare clic sull'ID richiesta o sul titolo per visualizzare una richiesta.
- Immettere una data di scadenza desiderata.
- Fare clic su Rinnova elemento.
Attenzione: quando si suggerisce una data di scadenza, assicurarsi di consultare le politiche di rinnovo della biblioteca del prestito scorrendo il modulo di richiesta verso il basso e facendo clic sull'icona del punto interrogativo (
 ) per aprire il profilo della directory delle politiche della biblioteca.
 - Viene visualizzato un messaggio di conferma e la richiesta viene visualizzata in Richieste di prestito > Ricevute > Rinnovo richiesto.
Nota: le etichette possono essere utilizzate per tenere traccia delle richieste e visualizzate nelle code di rinnovo del destinatario del prestito. Vedere Etichette per ulteriori informazioni.
Se la biblioteca che effettua il prestito accetta la richiesta di rinnovo, determinerà la nuova data di scadenza. Se è stata selezionata la compensazione della data di scadenza dell'utente, la data di compensazione verrà visualizzata all'utente in Il mio account e nelle notifiche ricevute. Per ulteriori informazioni sulla compensazione della data di scadenza utente, vedere Gestione richieste utente.
Se il prestatore rifiuta la richiesta di rinnovo, la data di scadenza originale rimarrà.
Mark a request as Lost
Se un documento ricevuto risulta mancante, marcare la richiesta come Perduta per avvisare la biblioteca che effettua il prestito.
Per contrassegnare un documento come smarrito:
- Nella categoria Richieste di prestito, fare clic su Ricevute.
- Gli elementi possono essere contrassegnati come Persi dalle code Ricevuti/In uso, Richiesto rinnovo, Approvato, Rinnovo negato, Scaduto e Richiamati.
- Fare clic sull'ID richiesta o sul titolo per visualizzare una richiesta.
- Selezionare Perso nella schermata dei dettagli della richiesta.
Lo stato della richiesta viene aggiornato a Persa e la richiesta viene spostata nella coda Ricevuta ma Mancante sia per la biblioteca prestatrice che per quella che effettua il prestito.
Se l'item è stato recuperato, restituirlo o rinnovarlo. Per ulteriori informazioni, vedere Restituire articoli.
Richieste inevase
Se una richiesta non viene soddisfatta da nessuno dei prestatori nella sequenza delle biblioteche a cui far richiesta, la richiesta resterà inevasa. Le opzioni per le richieste inevase includono Invia nuovamente richiesta, Modifica tipo di evasione o Annulla richiesta.
Per inviare nuovamente la richiesta:
- Fare clic sull'ID della richiesta inevasa.
- In Biblioteche che effettuano il prestito, immettere altri prestatori nella stringa Prestatore.
- La cronologia viene visualizzata di seguito per indicare i prestatori che hanno ricevuto in precedenza questa richiesta e la loro risposta.
- Facoltativo. Modificare i dati bibliografici in Dettagli richiesta, Note prestito, Note fatturazione o Costo massimo IFM .
- Le opzioni di ricerca vengono visualizzate per i campi Titolo, Autore, ISSN, ISBN e Numero OCLC .
- Il campo Edizione preferita non è modificabile.
- Nella schermata di richiesta, fare clic su Invia nuovamente richiesta.
- La richiesta verrà spostata in In attesa di risposta.
È possibile modificare il Tipo di evasione di una richiesta inevasa in Richiesta di acquisto, Acquisizioni WMS (se abilitata) o Consegna documento (se abilitata).
Per modificare il tipo di evasione della richiesta:
- Individuare la richiesta che si desidera modificare.
- Nella richiesta, fare clic su Modifica tipo di evasione e selezionare una delle seguenti opzioni:
- Consegna dei documenti
- Richiesta di acquisto
- Acquisizioni WMS
- La richiesta viene spostata nella nuova coda del tipo di evasione.
Nota: sebbene il pulsante Annulla richiesta sia ancora disponibile per queste richieste, non è necessario fare clic su questo pulsante poiché la richiesta è già stata chiusa. Se cliccato, lo stato della richiesta verrà aggiornato a Chiusa (annullata). Questa richiesta verrà quindi conteggiata due volte nel report Statistiche di utilizzo OCLC - Panoramica attività del destinatario del prestito come richiesta non soddisfatta e come richiesta annullata.
Respond to conditionals from lenders (from Produced status)