Presta a biblioteche non OCLC
Creare manualmente richieste di prestito per biblioteche non OCLC
Questa documentazione spiega come accettare e soddisfare le richieste di prestito da biblioteche non OCLC .
Prima di iniziare, assicurarsi che le code di consegna documenti siano state impostate in OCLC Service Configuration.
Per prestare un documento a una biblioteca non OCLC, è necessario creare un account utente in Tipasa per rappresentare la biblioteca prestatrice per poter tracciare il documento. Dovrai farlo per tutte le biblioteche non OCLC che prendono in prestito da te, ma dovrai creare il record utente solo una volta. Se esiste già un account per la biblioteca prestatrice, procedere con la creazione della richiesta e l'applicazione dei dati bibliografici.
Crea un record utente per la biblioteca non OCLC
- In Tipasa, accedere alla scheda Amministrazione.
- Selezionare Nuovo utente sul lato sinistro.
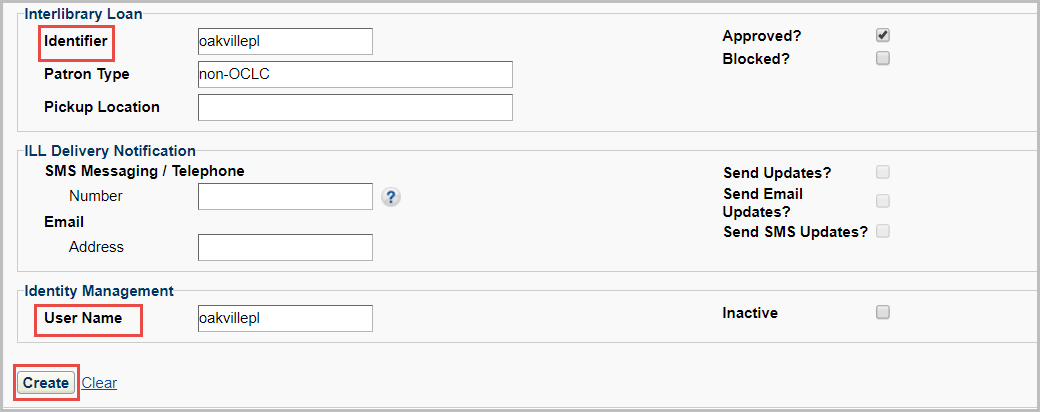
- Compila il modulo record utente. Fornire un nome e un'e-mail corretti.
- OCLC consiglia di utilizzare il nome della biblioteca nei campi Cognome e Nome utente. Anche se la biblioteca non accederà mai a Il mio account, sarà necessario fornire un nome utente nel campo nome utente in fondo al record. È possibile utilizzare lo stesso valore dell'identificativo prestito interbibliotecario. È anche possibile aggiungere un tipo di utente che indichi che l'utente non è una biblioteca OCLC . Se la tua biblioteca richiede l'approvazione, assicurati di fare clic su Approvato? casella di controllo.

Nota: se la propria biblioteca utilizza WorldShare Circulation, sarà necessario fornire le informazioni anche per i campi Circolazione. Se non si utilizza WorldShare Circulation, lasciare vuoti tutti i campi nella sezione Circulation.
- OCLC consiglia di utilizzare il nome della biblioteca nei campi Cognome e Nome utente. Anche se la biblioteca non accederà mai a Il mio account, sarà necessario fornire un nome utente nel campo nome utente in fondo al record. È possibile utilizzare lo stesso valore dell'identificativo prestito interbibliotecario. È anche possibile aggiungere un tipo di utente che indichi che l'utente non è una biblioteca OCLC . Se la tua biblioteca richiede l'approvazione, assicurati di fare clic su Approvato? casella di controllo.
- Fare clic su Crea. Viene visualizzata una finestra di messaggio, "L'utente è stato creato correttamente". Fare clic su OK. Viene visualizzata la schermata del nuovo record utente.
Creare la richiesta e applicare i dati bibliografici
- Creare una nuova richiesta utilizzando Document Delivery.
- Nella schermata di nuova richiesta, aprire la finestra Mecenate e immettere il nome della biblioteca nel campo Nome.
- Fare clic sulla lente d'ingrandimento per cercare le informazioni sull'utente.
- Selezionare il nome della biblioteca dai risultati della ricerca. Verrà visualizzata la schermata utente.
- Fare clic su Applica i dati del lettore alla richiesta ILL NEW. I dati dell'utente verranno applicati alla nuova richiesta.

- Fare clic su Salva per revisione. Alla richiesta è stato assegnato un numero di richiesta. Per visualizzare i dettagli della richiesta, fare clic sul numero della richiesta.
- La richiesta verrà spostata nella coda di fornitura del documento.
- (Facoltativo) Utilizzare le code Prestito avanzato per gestire il flusso di lavoro.
- Quando si è pronti per chiudere la richiesta, fare clic su Segna come completata.
contrassegnare la richiesta come completa al momento della spedizione e tracciarla nel sistema di circolazione oppure lasciare aperta la richiesta fino a quando la biblioteca prestatrice non la restituisce.
Monitoraggio della richiesta
Applicare i tag alla richiesta per tenere traccia della data di scadenza. Immettere le etichette desiderate nel campo Richiedi etichette.
![]()
Una volta che un elemento è stato etichettato, sarà possibile scegliere quel tag dall'elenco di tag sulla pagina di destinazione Tipasa e recuperare un elenco di tutte le richieste che condividono quel tag.

Per ulteriori informazioni sull'uso delle etichette nelle richieste, vedere Gestione delle etichette.
Fornire alle biblioteche non OCLC l'accesso a Il mio account
Per consentire alle biblioteche non OCLC di accedere al proprio account in Il mio account, la biblioteca avrà bisogno delle credenziali di accesso.
Autenticazione di base
Se si utilizza l'autenticazione di base:
- Creare un account per la biblioteca non OCLC utilizzando la scheda Amministrazione.
- Una volta creato il record utente, fare clic sul collegamento Imposta/Ripristina password per la biblioteca per impostare la password in Tipasa.
La biblioteca sarà in grado di accedere a Il mio account.
Autenticazione di terze parti
Le opzioni per fornire l'accesso a una biblioteca non OCLC utilizzando un sistema di autenticazione di terze parti con Tipasa:
- Il reparto IT deve creare un account valido nel sistema di terze parti per l'utilizzo da parte della biblioteca non OCLC . Includere il record utente della biblioteca che effettua il prestito nel prossimo caricamento utente. Per ulteriori informazioni, vedere File di dati utente.
OR
- Contattare il supporto OCLC per impostare più provider di identità per il sito Tipasa.
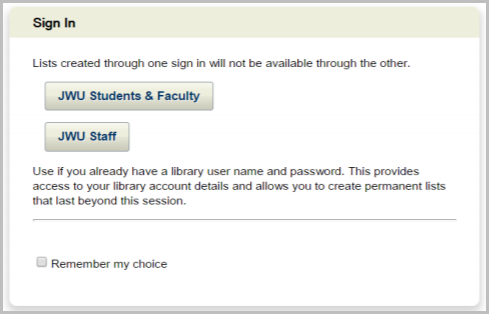
- Tutti gli utenti incontreranno prima una pagina di destinazione in cui dovranno fare clic su un pulsante corrispondente alla loro affiliazione.

- Una volta configurata la pagina di destinazione, creare un record utente per la biblioteca non OCLC utilizzando la scheda Amministrazione. Fare clic sul collegamento Imposta/Ripristina password per inviare alla biblioteca un collegamento per impostare la password in Tipasa.
- Tutti gli utenti incontreranno prima una pagina di destinazione in cui dovranno fare clic su un pulsante corrispondente alla loro affiliazione.
