Priorità di prestito
Informazioni sulle priorità di prestito
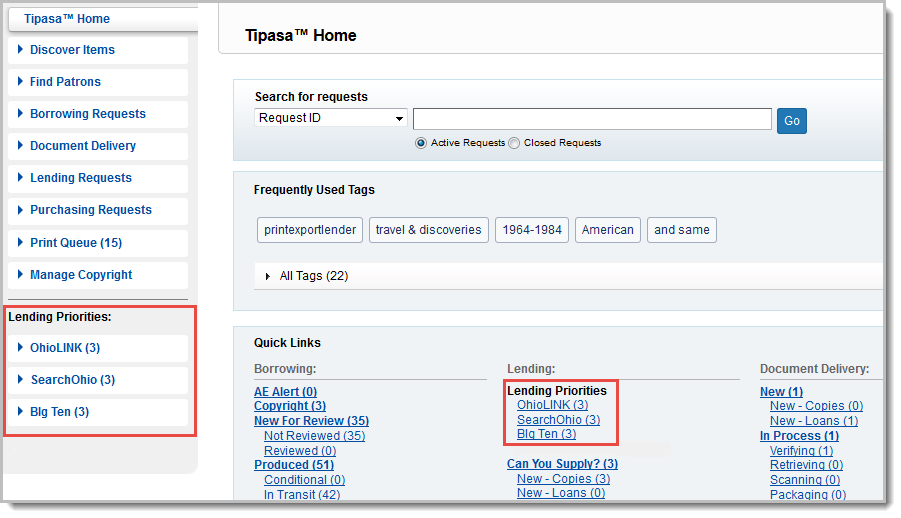
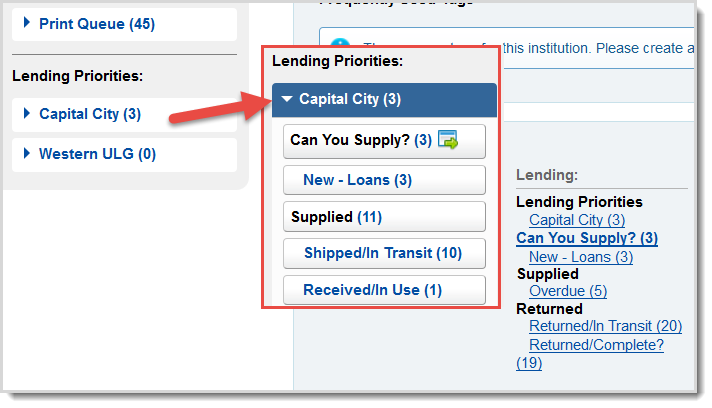
La funzione Priorità prestito consente di abilitare code speciali in Tipasa per le richieste dei richiedenti con priorità. I prestatari prioritari sono scelti dall'utente e possono includere i partner del consorzio della propria biblioteca o qualsiasi altra biblioteca di propria scelta. Tutte le richieste in entrata dalle biblioteche identificate come destinatari del prestito prioritari saranno visibili in una serie di code di prestito che appaiono nella parte inferiore del menu di navigazione a sinistra sotto la categoria Priorità prestito. Le nuove richieste dai prestatari prioritari verranno visualizzate anche nella sezione Collegamenti rapidi della Home Tipasa.
Quando si utilizzano le priorità prestito, tenere presente quanto segue:
- Le richieste dei destinatari del prestito con priorità vengono visualizzate nelle code delle priorità prestito e nelle code delle richieste di prestito.
- È possibile creare e nominare fino a cinque gruppi di destinatari del prestito prioritari che verranno visualizzati in Priorità prestito in uscita.
- Se la stessa biblioteca appartiene a più di un gruppo di destinatari del prestito prioritari, le loro richieste verranno visualizzate in tutte le rispettive code.
- È possibile creare gruppi di posseduto personalizzati nella configurazione del servizio OCLC per ciascun gruppo di destinatari del prestito prioritari oppure utilizzare i gruppi con profilo OCLC. Per un elenco dei gruppi con profilo, vedere Gruppi con profilo OCLC.
- Le richieste che appaiono nelle code delle priorità prestito hanno le stesse azioni disponibili e gli stessi stati di quelle che si trovano in richieste di prestito.

Impostare le priorità prestito
Prima di poter utilizzare le code delle priorità prestito, è necessario identificare le biblioteche che si desidera aggiungere come destinatarie della priorità, trovare o creare un gruppo di posseduti personalizzato e abilitare la funzione Priorità prestito in OCLC Service Configuration.
Passaggio 1: identificare i simboli OCLC dei destinatari del prestito prioritari
Prima di abilitare le priorità prestito, si desidera identificare quali biblioteche hanno la priorità. Con Priorità prestito è possibile mantenere le code di priorità prestito per un massimo di cinque gruppi di destinatari prioritari.
Ad esempio, nell'immagine seguente sono stati impostati tre gruppi di destinatari del prestito, ognuno con il proprio set di biblioteche (le biblioteche possono essere incluse in più di un gruppo):

Si desidera creare un elenco di tutte le biblioteche che si desidera aggiungere come destinatari del prestito prioritari e dei loro simboli. Avrai bisogno dei loro simboli per identificare se sono in un gruppo con profilo OCLC o se devi creare un gruppo di posseduto personalizzato (questi saranno descritti in dettaglio nel Passaggio 2: Trova o crea un gruppo di posseduto personalizzato). È possibile cercare l'identificativo OCLC di una biblioteca in OCLC Policies Directory.
Per cercare i simboli OCLC nella directory dei criteri:
- Accedere alla directory dei criteri.
- Nella directory dei criteri, sul pannello di navigazione a sinistra, dall'elenco Cerca per selezionare Nome istituto.
- Immettere il nome dell'istituto di cui si sta cercando l'identificativo OCLC.
-
A causa della varietà di abbreviazioni utilizzate nei nomi, si consiglia di utilizzare i caratteri jolly durante la ricerca per nome. Ad esempio, Ohio State univ*
-
Per ulteriori informazioni sulla ricerca nella directory dei criteri, vedere Directory dei criteri di ricerca.
-
- Fare clic <Enter> su Cerca o premere.
- Viene visualizzata una tabella con i risultati della ricerca. È possibile visualizzare il simbolo di qualsiasi istituto nella colonna Simboli.
Passaggio 2: trova o crea un gruppo di posseduti personalizzato
Una volta identificate le biblioteche che saranno le tue priorità destinatarie del prestito, devi considerare:
Le istituzioni sono raccolte in un gruppo con profilo OCLC ?
Se gli istituti che si desidera aggiungere come destinatari del prestito prioritari vengono raccolti in un gruppo con profilo, è possibile passare al passaggio successivo. I gruppi con profilo possono essere selezionati quando si abilitano le priorità prestito. Per un elenco dei gruppi con profilo, vedere Gruppi di condivisione risorse. Se non si conosce quali simboli sono contenuti in un gruppo con profilo, è possibile cercare il gruppo nella directory dei criteri. Per cercare un gruppo con profilo, seguire la stessa procedura descritta sopra per cercare un simbolo, ma selezionare Raggruppa simbolo dall'elenco Cerca per.
Le istituzioni sono state raccolte in un gruppo di posseduto personalizzato?
Se si dispone già di uno o più gruppi di posseduto personalizzati con gli istituti che si desidera aggiungere come destinatari del prestito prioritari, è possibile passare al passaggio successivo. In caso contrario, è necessario creare un gruppo di posseduti personalizzato per ogni gruppo di prestatari con priorità per cui si desidera avere in coda in Priorità prestito.
Per creare un gruppo di posseduti personalizzato di destinatari del prestito prioritari:
- Accedere a Service Configuration.
- Sul pannello di navigazione a sinistra, fare clic su WorldShare ILL > Gruppi di posseduti personalizzati.
- Nella schermata Configura gruppi di posseduto personalizzati, selezionare Crea nuovo gruppo di posseduto personalizzato.
- In Nome gruppo di posseduto personalizzato, immettere un nome per il gruppo di posseduto personalizzato. Questo non è il nome visualizzato in Tipasa.
- Opzionale. Immettere una descrizione del gruppo.
- Fare clic su Aggiungi/Modifica simbolo(i).
- Nella finestra Aggiungi/Modifica simboli OCLC , aggiungere i simboli per i destinatari del prestito prioritari nell'apposita casella. Separare più simboli con uno spazio.
- Fare clic su Aggiorna simboli.
- Fare clic su Salva come nuovo.
Passaggio 3: abilitare la funzione nella configurazione del servizio
Una volta creato un gruppo di posseduti personalizzato o trovato un gruppo con profilo o un gruppo di posseduto personalizzato che contiene i simboli delle biblioteche che si stanno aggiungendo come destinatari del prestito prioritari, è il momento di abilitare la funzione in Service Configuration.
Per abilitare le priorità prestito in uscita:
- Accedere a Service Configuration.
- Sul pannello di navigazione a sinistra, fare clic su WorldShare ILL > Flussi di lavoro avanzati.
- In Priorità prestito in uscita, selezionare la casella di controllo Attivo.
- Nel campo Nome visualizzato, immettere un nome visualizzato per il gruppo. Il nome visualizzato viene visualizzato nell'interfaccia di Tipasa, nella parte inferiore del pannello di navigazione a sinistra.
- Nei campi Filtra per, dal primo elenco selezionare Gruppo con profilo o Gruppo di posseduto personalizzato, a seconda del gruppo che si desidera aggiungere.
- Dal secondo elenco, selezionare il gruppo che si desidera aggiungere come priorità di prestito.
- Per aggiungere altri gruppi alle priorità di prestito, fare clic su Aggiungi riga e ripetere i passaggi 2-4. Per ogni riga aggiunta, in Tipasa verrà visualizzato un set separato di code per quel gruppo. È possibile avere fino a cinque righe (cinque gruppi di priorità di prestito in uscita).
- Per eliminare una riga, fare clic su Elimina riga.
- Fare clic su Salva.
