Creare una raccolta di conoscenze di base
Informazioni sull'aggiunta di raccolte di knowledge base
Per vedere le collezioni nella base di conoscenza globale, sfogliare le collezioni disponibili nella base di conoscenza di WorldCat (aggiornata mensilmente). In alternativa, eseguire una ricerca in Collection Manager per ottenere tutte le raccolte disponibili. Selezionare Tutte le raccolte dal menu a tendina Ambito e fare clic su Cerca.
Per alcune collezioni, OCLC e il vostro provider possono aggiungere e mantenere automaticamente i dati della collezione specifici della vostra biblioteca. Per ulteriori informazioni, vedere Fornitori e contatti per il caricamento automatico della raccolta.
Attenzione: Una volta richiesta la selezione automatica delle collezioni, non aggiungere, cancellare o aggiornare alcun titolo all'interno della collezione. Se c'è un problema con i titoli selezionati o mancanti dalla vostra collezione, contattate il supporto OCLC con degli esempi.
Per altri metodi di aggiunta di raccolte di knowledge base, vedere Scegliere un metodo per aggiungere o creare una raccolta di knowledge base.
Guarda un video
Selezionare e modificare le collezioni della base di conoscenza WorldCat (12:28)
Creare una raccolta di conoscenze di base
Per aggiungere titoli alla vostra collezione avete due possibilità. Seguire le istruzioni per creare una raccolta e per navigare nella raccolta creata. Seguire quindi i passaggi per aggiungere i titoli tramite il caricamento di un file KBART o per aggiungere un titolo alla volta nell'interfaccia.
Creare una collezione
- Accedere all'interfaccia WorldShare all'URL WorldShare della propria biblioteca. Sostituire yourlibrary con l'identificativo della propria biblioteca: https://yourlibrary.share.worldcat.org/wms
- Andare su Metadati (o Licenze)> Collection Manager.
- Fare clic su Crea una raccolta e selezionare Raccolta di basi di conoscenza dal menu a discesa Tipo di raccolta.
- Fare clic su Crea.
- Aprire l'accordion Proprietà di una nuova collezione:
- Immettere il nome della raccolta.
- Verrà generato automaticamente un ID collezione.
- È possibile personalizzare questo ID, ma il valore deve rimanere unico tra le collezioni.
- Opzionale. Inserire un fornitore.
- When you create a knowledge base collection, you have the option to complete the field for Provider. If your provider is not already in the WorldCat knowledge base, you can create a custom provider so that the provider will be available in your local knowledge base. Your custom provider (for example, "My University") will be searchable content in Collection Manager. You will be able to sort this provider among the other WorldCat knowledge base providers when you elevate links from a specific provider for WorldCat Discovery.
Note: Create local collections per provider for linking consistency. Including titles from multiple providers in a single locally created collection is not recommended.
- When you create a knowledge base collection, you have the option to complete the field for Provider. If your provider is not already in the WorldCat knowledge base, you can create a custom provider so that the provider will be available in your local knowledge base. Your custom provider (for example, "My University") will be searchable content in Collection Manager. You will be able to sort this provider among the other WorldCat knowledge base providers when you elevate links from a specific provider for WorldCat Discovery.
- Opzionale. Inserire una descrizione, selezionare gli attributi o inserire le note pubbliche o del personale.
- Fare clic su Crea.
Passare alla raccolta creata
- Passare alla casella di ricerca di Collection Manager.
- Selezionate Le mie collezioni selezionate come ambito e fate clic su Cerca.
- Utilizzare l'elenco a discesa Filtro nella parte superiore della schermata per restringere i risultati della ricerca. Scegliere:
- Collezioni che ho creato
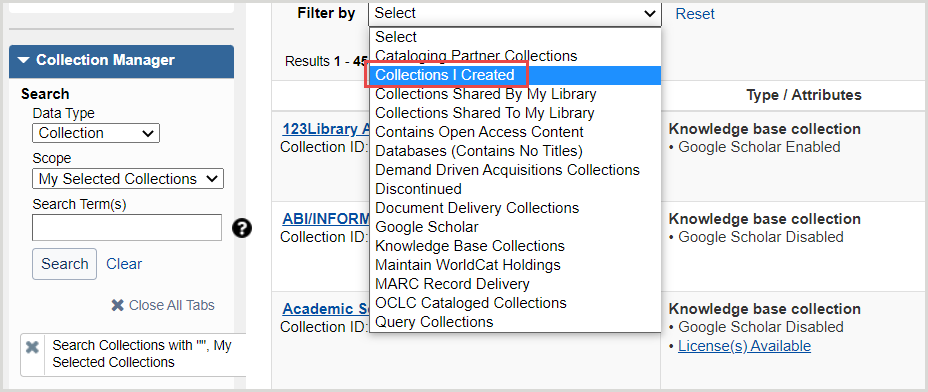
- Collezioni che ho creato
Opzione 1: Aggiunta di titoli tramite il caricamento di un file KBART
Scaricare un modello in formato KBART
- Navigare fino alla raccolta creata, fare clic sul nome della raccolta nei risultati della ricerca per aprirla.
- Usare l'elenco a discesa Azioni raccolta per selezionare Scarica titoli in questa raccolta. In alternativa, utilizzare il modello KBART.
- Se si seleziona Le mie collezioni selezionate, il file non sarà immediatamente disponibile. Quando il file è pronto, sulla raccolta appare un link Download here.
Apri il file .txtcome foglio di calcolo KBART
Inserire i dati del titolo KBART
Non è necessario compilare tutte le colonne del foglio di calcolo KBART. I valori necessari dipendono dal formato della raccolta che si sta creando. Sono disponibili due opzioni per inserire i dati del titolo.
Opzione A: Utilizzare il riempimento automatico di ""
È possibile aggiungere i numeri OCLC a un foglio di calcolo formattato KBART per far sì che il sistema popoli alcuni dei campi dei dati del titolo. Successivamente, sarà necessario inserire le informazioni sulla copertura e gli URL dei titoli. Per istruzioni, vedere Valori e formattazione KBART, "Valori di autocompilazione" .
Opzione B: Inserire i dati del titolo
È possibile compilare i dati del titolo consigliato e includere le informazioni sulla copertura e gli URL del titolo. Per istruzioni e dettagli sui valori dei dati richiesti, vedere Valori e formattazione KBART, Valori consigliati per formato.
Assicurarsi di:
- Utilizzare il formato corretto per le date. Vedere come Rappresentare le informazioni sulla copertura e Utilizzare il formato corretto della data
- Includere l'ID della raccolta nella colonna oclc_collection_id del file KBART. L'ID della raccolta nel vostro file deve corrispondere a quello della raccolta che avete creato, affinché i titoli vengano caricati correttamente nella vostra raccolta.
- Includere un valore numerico unico per ogni titolo nella colonna oclc_entry_id.
- Aggiungere un valore a ciascuna riga del titolo della colonna ACTION: Utilizzare il valore "raw"
Per ulteriori informazioni, vedere i valori della colonna KBART ACTION.
Salvataggio file
Caricare il file
- Cercare la raccolta creata. Fare clic sul nome della collezione nei risultati della ricerca per aprirla.
- Se avete bisogno di aiuto, consultate la sezione Navigare nella raccolta creata, qui sopra.
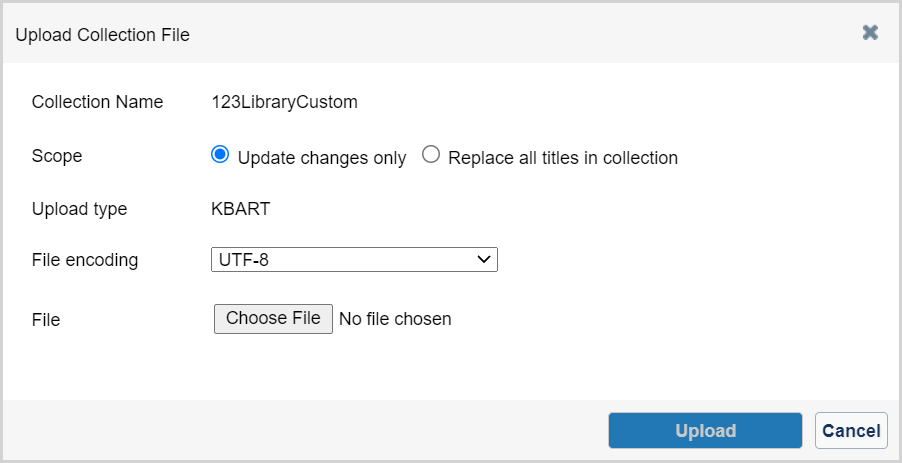
- Utilizzare l'elenco a discesa Azioni raccolta per selezionare Carica titoli in questa raccolta.
- Nel riquadro Carica file di raccolta, scegliere l'Ambito del file:
- Aggiorna solo le modifiche (impostazione predefinita)
La scelta di "Aggiorna solo le modifiche" fa sì che il sistema cerchi solo le modifiche nel file e usi il valore ACTION specificato per determinare come elaborare le modifiche. Scegliere questa opzione se:- Si sta creando una raccolta per la prima volta
- Sono state apportate modifiche ai dati del titolo e si sta utilizzando il valore "overlay" o "covoverlay" ACTION
- Sostituire tutti i titoli in collezione
Scegliendo "Sostituisci tutti i titoli nella raccolta", il sistema eliminerà o deselezionerà tutte le selezioni di titoli esistenti nella raccolta e le sostituirà con le informazioni contenute nel nuovo file che state caricando. Scegliere questa opzione se:- Si utilizza un file per eliminare o deselezionare i titoli da una raccolta.
- Si utilizza un file per eliminare o deselezionare i titoli da una raccolta.
- Aggiorna solo le modifiche (impostazione predefinita)
- Scegliere la codifica del file di caricamento
- Lasciare la codifica file predefinita UTF-8, a meno che non sia necessario modificarla. Se i dati della raccolta includono caratteri non latini/non romani, usare l'elenco a discesa Codifica file per cambiare la selezione predefinita in UTF-16LE (Unicode Text/Excel).
Sono disponibili le seguenti opzioni:- UTF-8
- ISO-88591 (LATINO-1)
- UTF-16LE (testo Unicode/Excel)
- Lasciare la codifica file predefinita UTF-8, a meno che non sia necessario modificarla. Se i dati della raccolta includono caratteri non latini/non romani, usare l'elenco a discesa Codifica file per cambiare la selezione predefinita in UTF-16LE (Unicode Text/Excel).
- Cercare e selezionare il file .txt e fare clic su Carica.
- Al termine dell'elaborazione del caricamento, visualizzare l'anteprima del report e decidere se approvare il caricamento KBART o scartarlo e ricominciare da capo.
- L'anteprima del caricamento sarà disponibile per 72 ore dalla data di generazione.
- La raccolta verrà quindi bloccata per la reindicizzazione fino a quando le modifiche non avranno avuto il tempo di essere elaborate.
I file Excel (.xls) e (.xlsx) NON verranno caricati correttamente. Il file deve essere salvato come file di testo (.txt) delimitato da tabulazioni, testo Unicode .txt.
Visualizzare lo stato del caricamento dei file
Nota: quando si segnalano problemi, includere l'ID del Registro e allegare il file che si è tentato di caricare. Se possibile, includete le credenziali proxy che ci permetteranno di accedere ai link full-text. I vostri dati sono necessari per diagnosticare e risolvere determinati problemi.
Dopo aver caricato una raccolta di knowledge base in Collection Manager, è possibile controllare lo stato del caricamento dei file aprendo la fisarmonica Cronologia della raccolta all'interno della raccolta. In alternativa, è possibile visualizzare lo storico della propria istituzione nella Cronologia attività dell'istituzione. Per istruzioni e dettagli sui rapporti dettagliati della Cronologia attività, vedere Cronologia attività.
Opzione 2: Aggiungere i titoli uno per uno nell'interfaccia
Aggiungere un titolo
- Dopo aver navigato verso la raccolta creata, fare clic sul nome della raccolta nei risultati della ricerca per aprirla.
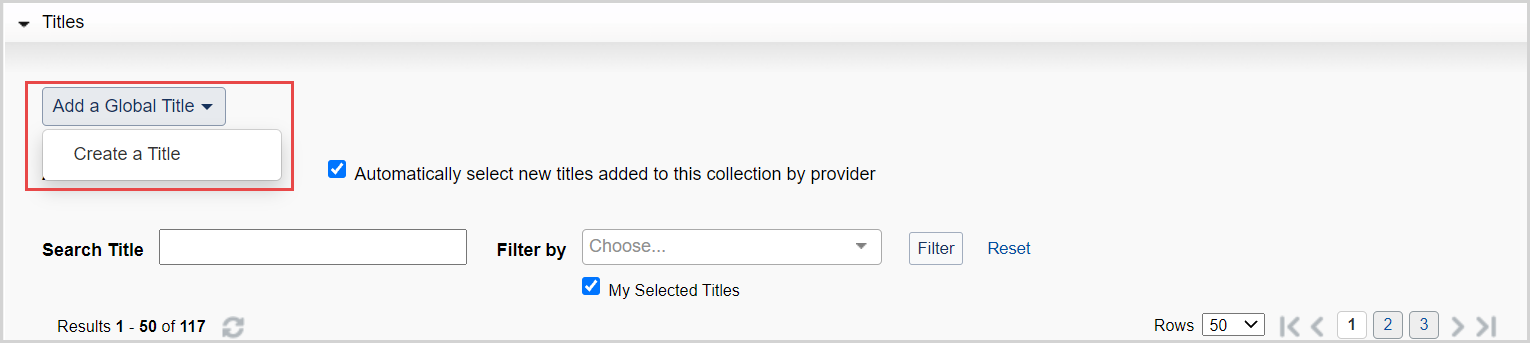
- Espandere la fisarmonica dei titoli .
Questa fisarmonica visualizza un elenco di titoli della collezione che gli utenti hanno selezionato. Per trovare l'elenco delle impostazioni a livello di titolo, vedere Impostazioni a livello di titolo nelle raccolte della knowledge base e/o la documentazione su come Modificare una raccolta per selezionare il proprio sottoinsieme di titoli per maggiori informazioni.
Aggiungi un titolo globale
Quando si visualizza una raccolta globale, utilizzare il menu a tendina Aggiungi un titolo globale e selezionare Crea un titolo per aggiungere un titolo alla base di conoscenza. Per ulteriori informazioni, vedere Come aggiungere un nuovo titolo a una raccolta esistente.
Aggiungere un titolo locale
Quando si visualizza una raccolta locale, utilizzare il menu a tendina Aggiungi un titolo locale per selezionare la modalità di aggiunta di un titolo della knowledge base alla raccolta locale. Selezionare Creare un titolo o Creare usando il numero OCLC da precompilare.

Creare un titolo
Selezionare questa opzione per aggiungere nuovi titoli digitando manualmente le informazioni. Per aggiungere manualmente i dati del titolo:
- Dall'elenco a discesa Aggiungi un titolo locale, selezionare Crea un titolo.
- Inserire il nome del titolo.
- Selezionare la profondità di copertura. Le opzioni includono:
- Audio
- Ebook
- Immagine
- Rivista - Estratti
- Giornale - Testo completo
- Giornale - indicizzato
- Giornale - Testo completo selezionato
- Giornale - Stampa
- Video
- Altro
- Inserire i campi obbligatori. I campi richiesti variano a seconda della profondità di copertura:
- Se si crea una raccolta di risorse elettroniche, inserire un URL del titolo che rimanda a una homepage per ogni titolo.
- Se si crea una collezione di riviste stampate, selezionare Journal - Print (Giornale - Stampa ) alla voce Coverage Depth (Profondità di copertura), quindi selezionare Add Coverage (Aggiungi copertura) alla voce Coverage (Copertura) e inserire i dettagli di copertura per ogni titolo. Per maggiori dettagli, consultare la sezione Copertura.
- Utilizzare il formato corretto della data (AAAA-MM-GG). Per maggiori dettagli, vedere i valori e la formattazione di KBART.
- Inserire le informazioni di collegamento appropriate. Vedere Impostazioni del livello del titolo nelle raccolte di knowledge base, Collegamento.
- Fare clic su Salva.
- Ripetete i passaggi per aggiungere ogni titolo fino a quando non avrete aggiunto tutti i titoli della collezione.
Crea utilizzando il numero OCLC per la pre-compilazione
Selezionare questa opzione per far sì che il sistema inserisca automaticamente i dati del titolo. Per aggiungere un titolo automaticamente:
- Dall'elenco a discesa Aggiungi un titolo locale, selezionare Crea usando il numero OCLC da precompilare.
- Inserire il numero OCLC nella casella visualizzata e fare clic su Continua. Il sistema troverà il record WorldCat e inserirà automaticamente le informazioni disponibili, come ad esempio:
- Titolo, numero OCLC, profondità di copertura, ecc.
- Si consiglia di verificare l'accuratezza della profondità di copertura.
- Se necessario, popolarlo:
- Informazioni sulla copertura
- URL del titolo
Selezione automatica dei titoli
L'impostazione Selezione automatica dei titoli nelle raccolte globali della knowledge base consente di selezionare automaticamente i titoli aggiunti dagli aggiornamenti dei dati OCLC. L'impostazione può essere attivata o disattivata indipendentemente dal fatto che sia stata selezionata l'intera collezione o un sottoinsieme di titoli.
L'impostazione predefinita dipende dalla selezione di tutti o di un sottoinsieme di titoli in una raccolta:
- Tutti i titoli di una raccolta sono selezionati - Abilitato per impostazione predefinita
- Viene selezionato un sottoinsieme di titoli in una collezione - Disabilitato per impostazione predefinita
È possibile attivare o disattivare l'impostazione in qualsiasi momento. Ad esempio, se sono selezionati tutti i titoli di una raccolta, tranne alcuni che sono soggetti a restrizioni regionali, l'impostazione sarà disattivata per impostazione predefinita. Attivare la selezione automatica dei titoli se si desidera che i titoli appena aggiunti vengano selezionati automaticamente. L'attivazione dell'impostazione non modificherà le selezioni attuali dei titoli. Piuttosto, i titoli aggiunti nei futuri aggiornamenti dei dati saranno selezionati automaticamente.
Nota: quando una collezione viene aggiornata da un feed automatico delle collezioni, non si deve selezionare l'opzione di selezione automatica dei titoli nell'accordion Titoli delle impostazioni della collezione. Per ulteriori informazioni, consultare la sezione Fornitori e contatti per il caricamento automatico della raccolta.
Per ulteriori informazioni, vedere Impostazioni a livello di titolo nelle raccolte di knowledge base.
Richiedere a OCLC di creare uno schema di collegamento per la propria collezione (facoltativo)
Gli schemi di collegamento sono necessari affinché gli articoli si risolvano in un testo completo. Indipendentemente dal modo in cui la raccolta viene creata (un titolo alla volta o tramite upload di file), è necessario uno schema di link per le raccolte di riviste elettroniche che permetta di risalire al testo completo degli articoli. Senza uno schema di collegamento, le citazioni degli articoli rimandano alla homepage della rivista invece che all'articolo.
OCLC può creare uno schema di collegamento per voi, ma solo se:
- Tutti i titoli sono sulla stessa piattaforma
- Il fornitore utilizza una struttura coerente per la propria sintassi di collegamento e
- La piattaforma supporta il collegamento a livello di articolo
Per maggiori dettagli, vedere Valori e sostituzioni dello schema di collegamento.
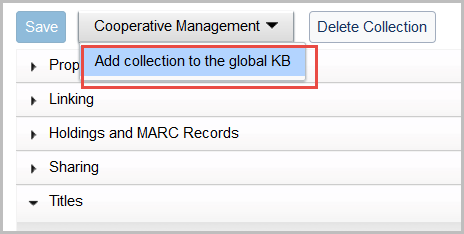
Mettete la vostra collezione a disposizione di altre biblioteche
Scoprite come aggiungere la vostra collezione personalizzata alla knowledge base globale di WorldCat in modo che tutte le altre biblioteche di Collection Manager possano selezionare e utilizzare i dati dei titoli della collezione. Vedere Gestione cooperativa.
Guarda un video
Creare collezioni della base di conoscenza WorldCat (11:07)
Questo video mostra l'uso di WorldShare Collection Manager e dei file KBART per creare collezioni di base di conoscenza per aggiungere le collezioni di e-journal, e-book o serie di stampa non presenti nella base di conoscenza globale di WorldCat.