Request Forms
Use the Request Forms screen in OCLC Service Configuration to customize your patron request forms. Patrons can use the patron request forms to request interlibrary loans.
WorldShare ILL Request Form
Use the WorldShare ILL Request form to configure and customize elements of the form for your library users and provide access from any discovery services and request any item via WorldShare ILL. Requests submitted via the form can be automatically routed to the automated request manager.
Questo modulo unico viene utilizzato per tutte le richieste ILL, ma il sistema preseleziona il tipo di servizio (Libro/media - Prestito o Articolo/capitolo - Copia) in base al tipo di richiesta (ad es., libro, articolo). Fare riferimento a Configure OpenURL, mappatura dei parametri OpenURL.
WorldShare Management Services (WMS) libraries have Identity management (IDM) set up for authentication in using this form. For libraries that do not use WMS, IP authentication is recommended. Refer to:
When you have familiarized yourself with the sections of the form, see Customize the patron request form for instructions on customizing your request forms.
Note: For an explanation of each available field, please see Request Form fields.
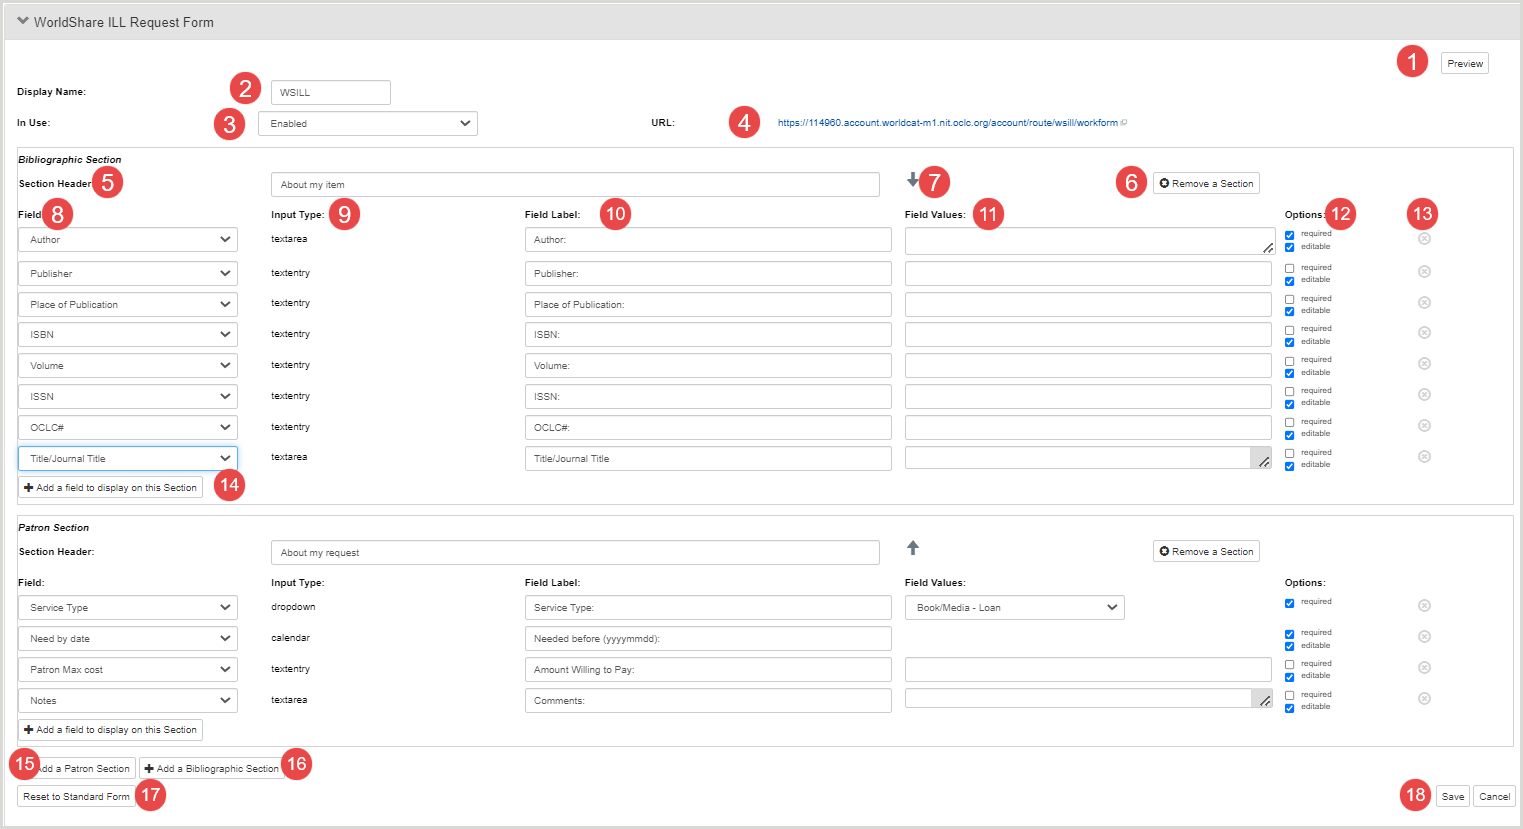
- 1. Preview
- Once you have configured the form, you can preview how it will appear to patrons. To preview the form, click Preview.
- 2. Display Name
-
The Display Name determines how the form will be labeled for users. To edit the Display Name, enter a new name in the Display Name field.
- 3. In Use
-
The In Use field turns the form on or off. Forms will not be available to patrons when they are disabled. The default is Enabled. To disable the form, select Disabled.
- 4. URL
-
The URL indicates the page where the forms is located. Click the URL to view the form.
- 5. Section Header
-
Use the Section Header to assign a title to the section of the request form. Entering a header can help the patron understand the type of information you expect them to input in the fields contained in the section. For example, you can title a section "About My Request" to inform patrons that the following fields will ask for information about the item being requested. Links and basic HTML formatting can be included in the Section Header. See Include links and formatting. To edit the Section Header, enter a new header into the Section Header field.
- 6. Remove a Section
-
Use the Remove a Section button to remove the section. Note: You will not be asked to confirm the removal of the section. Before clicking the button, make sure you want the section to be removed. To remove the section, click Remove a Section.
- 7. Move a section
-
Le frecce consentono di modificare la posizione di una sezione nel modulo. Le frecce appariranno solo nelle direzioni in cui è possibile spostare le sezioni. Per spostare la sezione in alto nel modulo, fare clic sulla freccia verso l'alto (
 ). Per spostare la sezione in basso nel modulo, fare clic sulla freccia verso il basso (
 ).
). - 8. Field
-
The fields you select determine what appears on the request form. If you have not configured the form yet, default fields will be selected. Note: Only the Note to Patron field can be reused on the forms. All other fields can only be used once.For an explanation of each available field, please see Request Form fields.
- 9. Input Type
- The Input Type displays how the patron inputs information into the field. Input type is fixed for each field.
- 10. Field Labels
-
The Field Label determines how the field is described on the form. Each field has a default field label. Use the field label to provide patrons with a description of the information you would like them to input in the field. For example, Patron Max cost could be relabeled to Max cost I am willing to pay. Note: Field labels are limited to 30 characters. To edit a field label, enter a new label in the Field Label.
- 11. Field Values
- Field Values can be used to enter default text or options that will appear on the form to the patron. For example, you may enter a value for Patron Max cost to let patrons know the maximum amount charged for any item. If the Input Type is dropdown, you can select the default selection from the list, or depending on the field, you can enter your own values to appear in the dropdown. If the Input Type is textentry, you can enter default text in the field.
- 12. Options
-
Options allow you to further define the fields on your form. By selecting an option, you can make fields required or editable.
- Select the Required check box if you want the field to be required. When a field is required, patrons must provide information in the field in order to submit the form. Patrons will encounter an error if they try to submit the form without filling out all required fields.
- Deselect the Required check box if you do not want to the field to be required. When a field is not required, patrons do not have to fill in the field.
- Select the Editable check box so that patrons can edit the field. Most fields should be editable.
- Deselect the Editable check box if you do not want patrons to edit the field.
- 13. Remove (delete) a field
-
Utilizzare l'icona di rimozione (
 ) per rimuovere un campo dalla sezione. Nota: non verrà chiesto di confermare la rimozione di un campo. Prima di fare clic sull'icona rimuovi, assicurati di voler rimuovere il campo. Per rimuovere un campo, fare clic sull'icona di rimozione () per rimuovere un campo dalla sezione.
 - 14. Add a field to display on this Section
-
Use the Add a field to display on this Section button to add another field to the section. To add a field to the section, click Add a field to display on this Section.
- 15. Add a Patron Section
-
Utilizzare il pulsante Aggiungi una sezione utente per aggiungere una sezione utente al modulo. Vedere Campi sezione utente per una descrizione di ogni campo nella sezione utente. Per aggiungere una sezione utente, fare clic su Aggiungi una sezione utente.
- 16. Add a Bibliographic Section
-
Utilizzare il pulsante Aggiungi una sezione bibliografica per aggiungere una sezione bibliografica al modulo. Vedere Campi della sezione bibliografica per una descrizione di ogni campo nella sezione bibliografica. Per aggiungere una sezione bibliografica, fare clic su Aggiungi una sezione bibliografica.
- 17. Reset to Standard Form
-
Use the Reset to Standard Form button to reset the form to the default (non-customized) version of the form. To reset the form, click Reset to Standard Form.
- 18. Save and Cancel
-
Once you have completed editing the form, you can save or cancel your changes. To save the form, click Save. To cancel your changes, click Cancel.
Note: You will need to substitute your institution's registry ID to customize the direct links. If you have customized your patron request form names, the direct link name will not reflect those changes.
- Sign in to OCLC Service Configuration
- Navigate to the WorldCat Registry > Identifiers
- Find the Identifier Type WorldCat Registry ID and the associated number
WorldShare ILL Request form configuration
Follow the instructions below to configure and provide links to your patron request forms. For an explanation of each available field, see Request Form fields.
Some points to keep in mind when configuring your form:
- Use the definitions in Bibliographic section fields and Patron Section Fields to create a draft of your form.
- Only the Note to Patron field can be reused on a form. All other fields can only be used once.
- Fields can be grouped into sections under a labeled Section Header to organize the information on the form.
- Sections can be moved up or down at any time by clicking the arrows in the upper right corner of each section.
- Fields can be reordered by removing and adding them in the order that you would like them to appear on your form.
- You can preview your form before you save it to confirm that it will appear to your patrons as you expect.
- Any updates you make to the patron request form will not take effect immediately. Changes will usually appear on the form within 2-3 minutes.
Before you begin: WorldCat Discovery libraries only
Enable OpenURL in WorldCat Discovery or WorldCat Local:
For more information, see Configure OpenURL.
- Navigate to the WorldCat Discovery and WorldCat Local > Place Hold/Request Buttons module of the OCLC Service Configuration.
- Locate the Resource Sharing (Any Level) section.
- Configurare i campi seguenti:
- Resource Sharing Button Label: enter the text to appear on the WorldShare ILL request button in WorldCat Discovery
- Per una migliore visualizzazione, non superare i 40 caratteri nell'etichetta.
- Type of button configuration: select OpenURL 1.0
- Choose an OpenURL Resolver from the OpenURL Resolvers you have already registered with OCLC: select the WorldShare ILL OpenURL resolver previously configured.
- Resource Sharing Button Label: enter the text to appear on the WorldShare ILL request button in WorldCat Discovery
- Under the For items owned by WorldCat Libraries section, determine which item types should display the OpenURL request button in WorldCat Discovery.
- If you do not want patrons to be able to place an ILL request for a particular item type, select None.
- Click Save Changes at the bottom of the screen.
Customize the patron request forms
If this is your first time customizing the patron request forms, the forms will contain default fields. Forms can be customized to include parameters and information relevant to your library.
Note: For an explanation of each available field, please see Request Form fields.
To customize your patron request forms:
- In Service Configuration, on the left navigation, click WorldShare ILL > Request Forms.
- Click the WorldShare ILL Request Form accordion.
- If this is your first time customizing the form, you will see the default form.
- Edit the Section Header or use the default text.
- Under Field, click the field list to select a field.
- Input type is fixed for each field and will change depending on the field you select.
- Optional. Rename the field by entering a new Field Label.
- Use the field label to provide patrons with a description of the information you would like them to enter.
- For example, Patron Max cost could be relabeled Max cost I am willing to pay.
- Field labels are limited to 30 characters.
- Determine whether you would like to apply any of the Options to the field.
- Select the required or editable check box to turn the options on.
- Deselect the check boxes to turn the options off.
- Optional. To remove the field, click the remove icon (
 ) at the end of the field line.
- You will not be asked to confirm the removal of a field. Before clicking the icon, make sure you want the field to be removed.
- To add another field, click Add a field to display on this Section.
- Continue adding and editing the fields you want to include until you are satisfied with that section of the form.
- At any time, you can click Preview at the top of the form to view the form as a patron will see it.
- To add another section, click Add a Patron Section or Add a Bibliographic Section (fields will differ depending on the section you select).
- Repeat steps 4-11 until you are satisfied with the sections and fields within each.
- Click Preview to confirm that the forms looks as you expect.
- Click Save you save your customizations to the form. Patrons will not be able to see the changes you have made to the form until you save it.
- Repeat steps 2-14 for any additional forms you want to configure.
- Continue to Step 2: Provide links to your patron request forms for information on providing links to the forms.
Note: At any time, you can click Reset to Standard Form at the bottom left of the form to return to the default (non-customized) version of the form.
Add copyright compliance and acceptance for non-US Libraries
Confirm and track acceptance of local copyright terms by adding the Copyright Acknowledged and Copyright Declaration fields to your request form.
Libraries in Australia, New Zealand, Spain, and the United Kingdom require a copyright acknowledgement to track acceptance of local copyright terms.
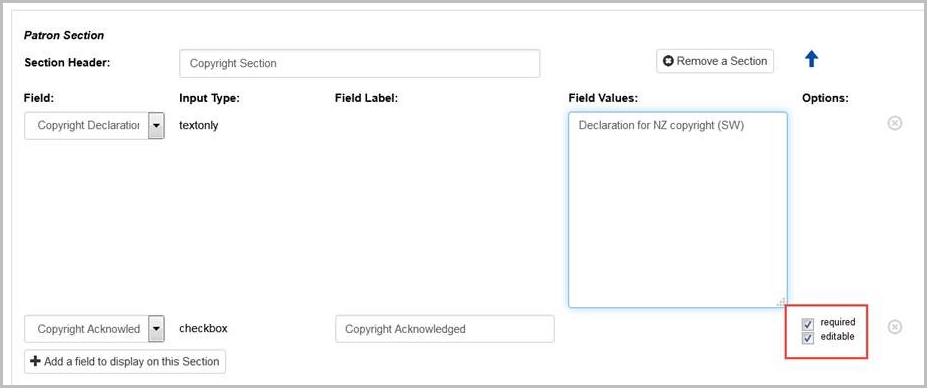
- Click Add a Patron Section. Enter a Section Header title.
- In the new Patron Section, click Add a field to display on this Section.
- Select Copyright Declaration and enter your Copyright terms.
- Click Add a field to display on this Section.
- Select Copyright Acknowledgement.
- Click Preview to confirm that the form looks as you expect.
- Click Save to save customizations to the form.
Include links and formatting
Links and basic HTML formatting can be included in selected fields within Request Forms, making it easier to communicate information to users within the forms.
The below fields allow basic HTML formatting:
- Section Header
- Copyright Declaration
- Nota
- Note to Patron
The allowed formatting tags are:
- Tag di collegamento: <a></a>
- Bold tag: <b></b>
- Tag corsivo: <i></i>
- Underline tag: <u></u>
- Paragraph tag: <p></p>
Note: Any other HTML or JavaScript codes will be stripped and will not display on the form.
Compila automaticamente il tipo di utente nei moduli di richiesta
Il valore di illPatronType dal record utente verrà compilato automaticamente nel campo Stato dei moduli di richiesta. Lo stato utente verrà automaticamente applicato alle richieste ILL e nelle statistiche di utilizzo.
I valori del campo Stato sono disponibili in OCLC Usage Statistics.
Nota: se la biblioteca utilizza WMS Circulation, verrà utilizzato il valore della sezione Tipo utente prestito interbibliotecario del record utente e non la categoria del destinatario del prestito. Assicurarsi di fornire valori nel campo illPatronType del caricamento utente che riflettano categorie significative per le statistiche relative al prestito interbibliotecario. Per ulteriori informazioni sui caricamenti degli utenti, vedere File di dati degli utenti.
- Nella sezione utente, fare clic su Aggiungi un campo da visualizzare in questa sezione.
- Seleziona Stato.
- Selezionare l'elenco a discesa Valori campo .
- Immettere tutti i valori utilizzati per illPatronType per il proprio istituto.
- La corrispondenza non fa distinzione tra maiuscole e minuscole.
- I valori illPatronType per ogni utente sono generalmente inclusi nel caricamento dell'utente. Per ulteriori informazioni, vedere File di dati utente. Per le biblioteche che creano e/o aggiornano manualmente i record utente nell'interfaccia staff, verrà utilizzato il valore impostato come illPatronType nel record utente.
- Facoltativo. Modificare l' etichetta del campo per lo stato in modo che sia più descrittivo per gli utenti.
- Click Preview to confirm that the form looks as you expect.
- Click Save to save customizations to the form.
Il valore del record utente per Tipo di utente compila automaticamente il campo Stato se viene trovata una corrispondenza tra il valore nel record utente e i valori configurati nel campo valori a discesa.
Nota: se un utente ha un tipo di utente che non è stato aggiunto nei valori dei campi per lo stato nei flussi di lavoro di richiesta dell'utente, nella richiesta non verrà inserito alcun valore. L'utente dovrà selezionare un'opzione dai valori configurati.
Configure Pickup Location on Request Form
The request form can be configured to provide patrons with pickup locations, which allows you to easily identify where to send an item for patron pickup if you have multiple branches.
Nota: se nel record di un utente nel modulo WorldShare Admin vengono definiti un valore della Sede e/o di una Sede di ritiro, quel valore sostituirà la posizione di ritiro predefinita che è stata definita nel modulo di richiesta WorldShare ILL all'interno di OCLC Service Configuration.
- Nella barra di navigazione a sinistra, fare clic su WorldShare ILL > Moduli di richiesta.
- Aprire il modulo (ad es. Modulo di richiesta libro) che deve contenere il campo Posizione di ritiro.
- Aggiungere il luogo di ritiro.
- Set the Pickup Location field as required/not required based on the desired behavior.
- Fare clic per visualizzare/modificare i valori dei campi.
- Selezionare le sedi di ritiro desiderate che si desidera includere nel modulo di richiesta.
- Se non sono disponibili posizioni attive, viene selezionata automaticamente Nessuna selezione.
- Impostare la posizione predefinita desiderata. È necessaria una sede di ritiro predefinita.
- Per aggiungere o modificare posizioni, vedere Posizioni ILS nel modulo Integrazione circolazione.
- Fare clic su Salva.
- Fare clic su Salva per completare l'impostazione della posizione di ritiro.
Nota: assicurarsi di salvare il modulo per salvare le modifiche alla posizione di ritiro. Fare clic su Anteprima per vedere come apparirà l'elenco a discesa agli utenti che utilizzano il modulo. - Repeat steps 5-8 for each form that has a Pickup Location.
Provide links to your patron request form
Provide your patrons with a link to the WorldShare ILL Request Form using OpenURL. Refer to Configure OpenURL for more information.
OpenURL
An OpenURL can be used to configure your library's discovery interfaces to send OpenURLs to the request forms for items that your patrons want to borrow. OpenURLs take the bibliographic information from the discovery interface and insert it into the appropriate patron request form.
Use the following base URL in the configuration modules of your discovery interfaces and replace xxxxxx with your library's WorldCat Registry ID (Find your Registry ID):
https://yourregistryid.account.worldcat.org/account/route/wsill/openurl?
-
If your library uses EZproxy, prepend the EZproxy information: https://yourezproxybaseurl/login?url=https://yourregistryid.account.worldcat.oclc.org/account/route/wsill/openurl?
If the discovery interface requires you to configure custom linking syntax, see Configure Custom OpenURL Links.
Request Form fields
Bibliographic Section Fields
The Bibliographic Section contains fields that patron can use to describe the item they are requesting.
These are all the fields available in the Bibliographic Section:
Patron Section Fields
The Patron Section contains fields that the patron can use to describe themselves or the item they are requesting.
These are all the fields that are available in the Patron Section:
| Campo | Descrizione |
|---|---|
|
Address 1 |
Patron's street address |
|
Address 2 |
Other address information, such as Apartment, Suite, etc. |
|
Città |
Patron's city |
| Copyright Acknowledged |
Patron acknowledges the copyright terms set by the institution. The patron must acknowledge the copyright terms on the patron request work form to submit copy requests. Note: This setting is for libraries in Australia, the U.K., Spain, and New Zealand. See Per ulteriori informazioni, aggiungere la conformità al copyright e l'accettazione per le biblioteche non statunitensi. |
| Copyright Declaration |
Declaration of copyright terms to the patron. Links and basic HTML formatting can be included in the Copyright Declaration as well. See Include links and formatting. Note: This setting is for libraries in Australia, the U.K., Spain and New Zealand. See Per ulteriori informazioni, aggiungere la conformità al copyright e l'accettazione per le biblioteche non statunitensi. |
|
Paese |
Paese dell'utente. Selezionare il proprio paese dall'elenco per impostare l'impostazione predefinita o, per precompilare i moduli di richiesta con il paese immesso nel record utente, vedere Caricamento dei dati dell'utente delimitato da tabulazioni. |
|
This field can be customized to allow patrons to select a department they are associated with from a customized list.
Examples:
|
|
|
Edizione |
Allows the patron to select the preferred edition of the requested item from a list (Any, Recent, This). |
|
|
Patron's email address |
|
Fax |
Patron's fax number |
|
First Name |
Patron's first name |
|
Patron's last name |
|
|
Need by Date |
Allows the patron to enter the date by which the item is needed (in YYYYMMDD format) This field appears in the Notes field of the Patron section in the borrowing request. |
|
Enter additional information or provide directions to patrons. When displayed to the patron, the field will not begin with the Note to Patron field label. This field can be reused throughout the form. Links and basic HTML formatting can be included in the Note to Patron field. See Include links and formatting. Examples:
|
|
|
Nota |
Provides the patron with a free text field to enter any relevant information about themselves or their request. This field cannot be reused. The borrowing library can use this field to enter relevant information as well. Entered via the Comments field in the form. The borrowing library can access the Notes field in the Patron section of the borrowing request. Links and basic HTML formatting can be included in the Notes field. See Include links and formatting. Character limit: 500 If the Patron Max cost and Need by Date are included on the Request Form, any information added to these fields are included in the Notes field and are included in the 500 character limit. Examples of potential patron entries:
|
|
ID lettore |
Allows the patron to enter an identification number (library card, student or faculty id, etc.) in a free text field. If you have enabled WorldShare ILL and WorldShare Circulation integration, you must include this field on the Request Form and select Required. Please see Imposta integrazione per ulteriori informazioni. The barcode field in the Patron data load maps to the Patron ID field in the Patron request form. |
|
If your library charges patrons for certain types of ILL requests, this field allows you to ask patrons to provide information about the maximum amount (in US dollars) that they are willing to pay for a particular item. If it is used, the label could be changed to provide patrons with clearer instructions about what information to enter, or a Note to Patron could be added to explain the meaning of this field. This field appears in the Notes field of the Patron section in the borrowing request. Examples:
Please see Maximum Cost for information about setting the institution's maximum cost. |
|
|
Phone |
Patron's phone number. |
|
Pickup Location (Maximum 400 branches) |
Allows the patron to select a preferred pickup location from a customized list. The request form can be configured to provide patrons with pickup locations, which allows you to easily identify where to send an item for patron pickup if you have multiple branches.
|
|
Codice postale |
Patron's postal code (e.g., zip code) |
| Formato di consegna preferito |
Consentire all'utente di specificare e salvare una preferenza per i materiali elettronici o cartacei. I valori dei campi includono:
Se il formato di consegna preferito non è incluso nel modulo di richiesta, il valore predefinito è Nessuna preferenza. |
|
Tipo di servizio |
Consente all'utente di selezionare il tipo di servizio richiesto tra le due opzioni nell'elenco:
|
|
State/Province |
Consente all'utente di immettere il proprio stato. Selezionare lo stato o la provincia dall'elenco per impostare l'impostazione predefinita. I valori sono disponibili per Stati Uniti, Canada e Australia. È necessario selezionare un paese se Stato/Provincia è incluso nel modulo o, per precompilare i moduli di richiesta con lo stato/provincia inserito nel record utente, vedere Caricamento dei dati dell'utente delimitato da tabulazioni |
|
Status |
Patron's status (within the library, company, school, etc.), selected from a list of customized statuses.
|
Popolazione campo modulo utente
Quando un utente della biblioteca ha effettuato l'accesso, l'account utente verrà collegato automaticamente alla richiesta. Se hanno effettuato l'accesso, alcuni dati utente vengono inseriti automaticamente nel modulo.
I campi compilati automaticamente includono:
- First Name
- Last Name
- ID lettore
- Phone
- Address 1
- Address 2
- Città
- State/Province
- Codice postale
- Status
Gli altri campi, sebbene possano essere presenti nel record lettore, non verranno compilati automaticamente nel modulo. Questi includono:
- Luogo di ritiro
- Dipartimento
Tieni presente che puoi etichettare i campi in modo che siano più significativi per gli utenti.
Configure Custom OpenURL Links
An OpenURL can be used to configure your library's discovery interfaces to send OpenURLs to the request forms for items that your patrons want to borrow. OpenURLs take the bibliographic information from the discovery interface and insert it into the appropriate patron request form.
Use the following base URL in the configuration modules of your discovery interfaces and replace xxxxxx with your library's WorldCat registry ID (Find your registry ID):
https://yourregistryid.account.worldcat.org/account/route/wsill/openurl?
Here's an example of OpenURL 1.0 syntax:
- https://xxxxxx.account.worldcat.org/account/route/wsill/openurl?rfr_id=<?rfr_id?>&genre=<?rft.genre?>&jtitle=<?rft.jtitle?>&rft.atitle=<?rft.atitle?>&rft.volume=<?rft.voume?>&rft.issue=<?rft.issue?>&rft.date=<?rft.date?>&rft.pages=<?rft.pages?>&rft.issn=<?rft.issn?>&rft.au=<?rft.au?>&rft_id=info:oclcnum/<?oclcnum?>
| Form field name | OpenURL 0.1 | OpenURL 1.0 (Z39.88-2004) |
|---|---|---|
| Titolo articolo/Titolo capitolo | atitle | rft.atitle |
| Autore/Autore articolo |
aufirst auinit auinit1 auinitm aulast |
rft.aufirst rft.auinit rft.auinit1 rft.auinitm rft.aulast rft.ausuffix rft.au rft.aucorp |
| Data | data | rft.date |
| DOI | id=doi: | N/A |
| Edizione (testo) | edizione | rft.edition |
|
Formato |
genere | rft.genre |
| ISBN | isbn | rft.isbn |
| ISSN | issn | rft.issn |
| Problema | problema | rft.issue |
| OCLC# | N/A |
rft.oclcnum rft_id=info.oclcnum/ |
| Numeri di pagina |
pagine spage epage |
rft.pages rft.spage rft.epage |
| Luogo di pubblicazione | N/A | rft.place |
| PMID | id=pmid: | N/A |
| Editore | N/A | rft.pub |
| Titolo/Titolo rivista |
titolo titolo |
rft.jtitle rft.btitle rft.stitle rft.title |
| Come si è venuti a conoscenza di questo documento?* | sid | rfr_id |
| Volume | volume | rft.volume |
*The value of sid/rfr_id will not display to the user in the form. This data is stored and will be visible to library staff in the request Verification field in WorldShare ILL. If the user enters a value in the Where did you learn about this item? field, this data will also be visible to staff in the Verification field.
Customize the request form display
You can customize the look of the request form by navigating to the WorldCat Discovery and WorldCat Local > User Interface Options in the OCLC Service Configuration. Use this screen to update your banner and custom links.
Attenzione: la modifica di queste impostazioni cambierà l'aspetto dell'interfaccia WorldCat Discovery. Vedere Opzioni interfaccia utente per ulteriori opzioni di configurazione di WorldCat Discovery.
Request form custom colors
Request form custom colors are controlled by the below settings:
| Setting | Option | Recommendations |
|---|---|---|
| Colore di intestazione e piè di pagina |
|
Per l'intestazione e il piè di pagina, selezionare un colore della luce che rispecchi al meglio il colore principale del brand del proprio istituto. |
| Colore della barra di navigazione |
|
In base ai colori selezionati, il testo sulla barra di navigazione sarà bianco o nero.
|
Impostazioni logo
Collegamenti personalizzati
Choose up to 7 custom links to appear in the Resources menu. Provide the URLs, link type and accompanying text for up to 7 custom web links (e.g., links leading to your library home page, Ask a Librarian, or My Account).
C'è un limite di 25 caratteri nel testo per ogni collegamento.
Nota: se si desidera consentire l'accesso remoto al di fuori del proprio indirizzo IP, uno dei collegamenti personalizzati deve essere alla pagina di accesso remoto ed è necessario scegliere login di accesso remoto come tipo di collegamento.
| Collegamento personalizzato | How to configure |
|---|---|
| Collegamento personalizzato: Proxy |
Creare questo collegamento se si dispone di un servizio proxy che consente agli utenti esterni al proprio indirizzo IP di accedere al contenuto e ai servizi della biblioteca con restrizioni. Utilizzare il link personalizzato 3 per configurare il link personalizzato di accesso remoto.
Quando viene selezionata una risorsa che richiede l'autenticazione remota, gli utenti della biblioteca vedranno una casella con la dicitura Autenticazione richiesta e include un collegamento per accedere. Per ulteriori informazioni, vedere la documentazione EZproxy. Se l'autenticazione della biblioteca è gestita tramite un servizio diverso da EZproxy, è necessario confermare il formato URL con il fornitore del proxy. |
| Collegamento personalizzato: altro URL |
Creare questo collegamento per altre risorse che si desidera fornire agli utenti della biblioteca, ad esempio il servizio di consultazione virtuale.
|
Add a custom notification
Configurare un messaggio personalizzato da mostrare agli utenti della biblioteca in WorldCat Discovery e ne Il mio account per notificare loro informazioni importanti.
Per ulteriori informazioni, vedere Impostazioni del display, Notifica personalizzata.

Choose a label for the Resources tab
Configurare l'etichetta per il menu Risorse nella barra di navigazione e nel piè di pagina. Conservare l'etichetta predefinita di Risorse o immettere un'etichetta personalizzata appropriata per gli utenti.

Per configurare un'etichetta personalizzata:
- Attivare l'impostazione Usa testo personalizzato . In caso contrario, verrà visualizzato il testo predefinito di Risorse .
- Immettere il testo da visualizzare.
- Limite di 35 caratteri.
- Opzionale. Aggiungere la traduzione per il testo visualizzato.
- Fare clic su Salva.
WorldCat Discovery Request Form
Il modulo di richiesta WorldCat Discovery non deve più essere utilizzato. Utilizzare il modulo di richiesta WorldShare ILL. Contattare il supporto OCLC per qualsiasi domanda.
Guarda un video
Configure patron-initiated requests in WorldCat Discovery
Durata: 12:08
Informazioni su come configurare la richiesta ILL avviata dall'utente per WorldCat® Discovery per consentire agli utenti di cercare e identificare elementi, quindi avviare le richieste.