Questa pagina potrebbe essere generata da una traduzione automatica. La qualità e l'accuratezza della traduzione automatica possono variare significativamente da un testo all'altro. In caso di dubbi, consultare la pagina originale in inglese qui.
Learn how to create requests from a blank workform, using Discover Items, and from an existing request, and also find information about editing requests in Resource Sharing for Groups.
Select whether you are using the Legacy interface or the Modernized interface in Resource Sharing for Groups.
Create requests
Patrons can use the patron request forms to request interlibrary loans.
Use the WorldShare ILL Request form to configure and customize elements of the form for your library users and provide access from any discovery services and request any item via WorldShare ILL. Requests submitted via the form can be automatically routed to the automated request manager.
You may search for items using Discover Items and create requests by using the Create Request heading. Clicking Create Request produces a blank form.
To create a request:
Type the details of your request in the fields provided.
(Optional). To locate citation information, search for Article Title or Title using the "Search Google Scholar", "Search Google Books", or "Search Google" links located to the right of these fields.
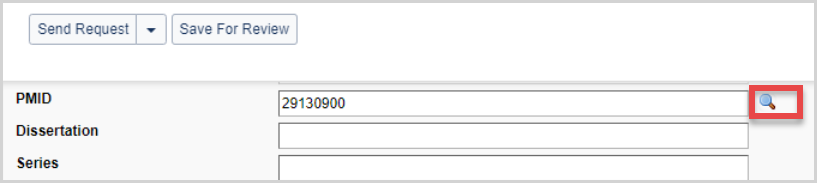
(Facoltativo). Immettere un PMID e utilizzare la lente d'ingrandimento per recuperare informazioni sulla citazione da PubMed. Se le informazioni della citazione sono corrette, selezionare Applica e salva per applicare le informazioni della citazione PubMed alla richiesta.
Choose the request Type and Format.
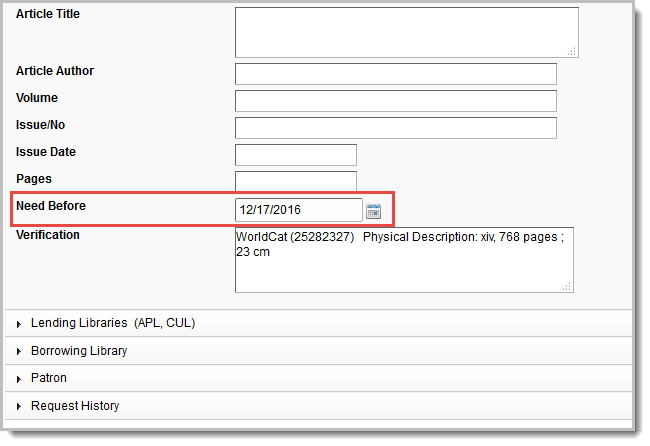
Provide a Needed By: date.
Apply your constant data record.
Provide a lender in the Lender String.
Click Send Request. A confirmation message appears and the request appears under the category Borrowing Requests > New For Review.
Click Borrowing Requests from the left navigation bar. The list of Borrowing categories expands.
Click New For Review.
Click your new request ID number.
In the new request screen, click Send Request. A confirmation message appears.
Choose either View Next Request or Return to list. Your request is sent to the lender and you are returned to the screen you selected.
Create borrowing requests using Discover Items
You can search for items and create a request under Discover Items.
To discover items and create requests:
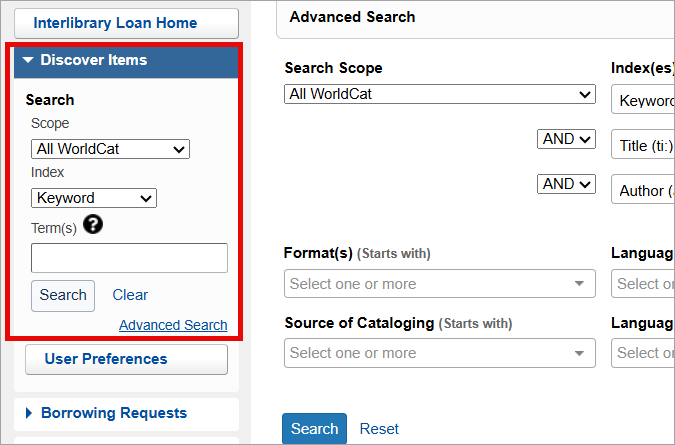
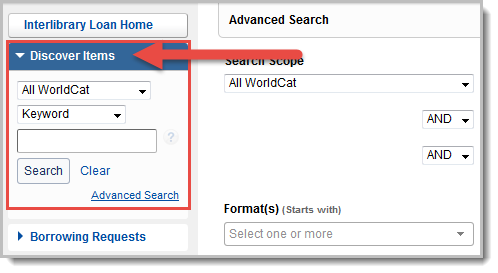
Click Discover Items in the left navigation. When you open the Discover Items tab, an Advanced Search form also opens in the main panel of the screen. See Advanced search for additional information about this function.
For a basic search, choose where you would like to search and the type of search from the drop-down lists at the top of the tab.
Type your search terms in the box provided.
Click Search. Matching results appear, along with holdings display options. When you click Search, the Advanced Search form collapses at the top of the screen. Click Advanced Search to expand or collapse the form.
On the Results screen, you may search or view items using one of the following options:
Hover your cursor over the information icon () next to the title to see brief bibliographic data.
If available, click the View Now link for open access resources. The resource will open in a new window.
Search for versions with the same title and author by clicking the link. This will launch a new search based on title and author.
To submit a new request, click Create Request. The request form appears.
To display holdings, use one of the following options:
Click State Holdings, Regional Holdings, or All Holdings.
Note: Regional Holdings includes all holdings in contiguous states.
To display holdings from a Custom Holdings Path or OCLC profiled Group, select that option from the Filter by drop-down list. Click Go to see results based on the selected filters.
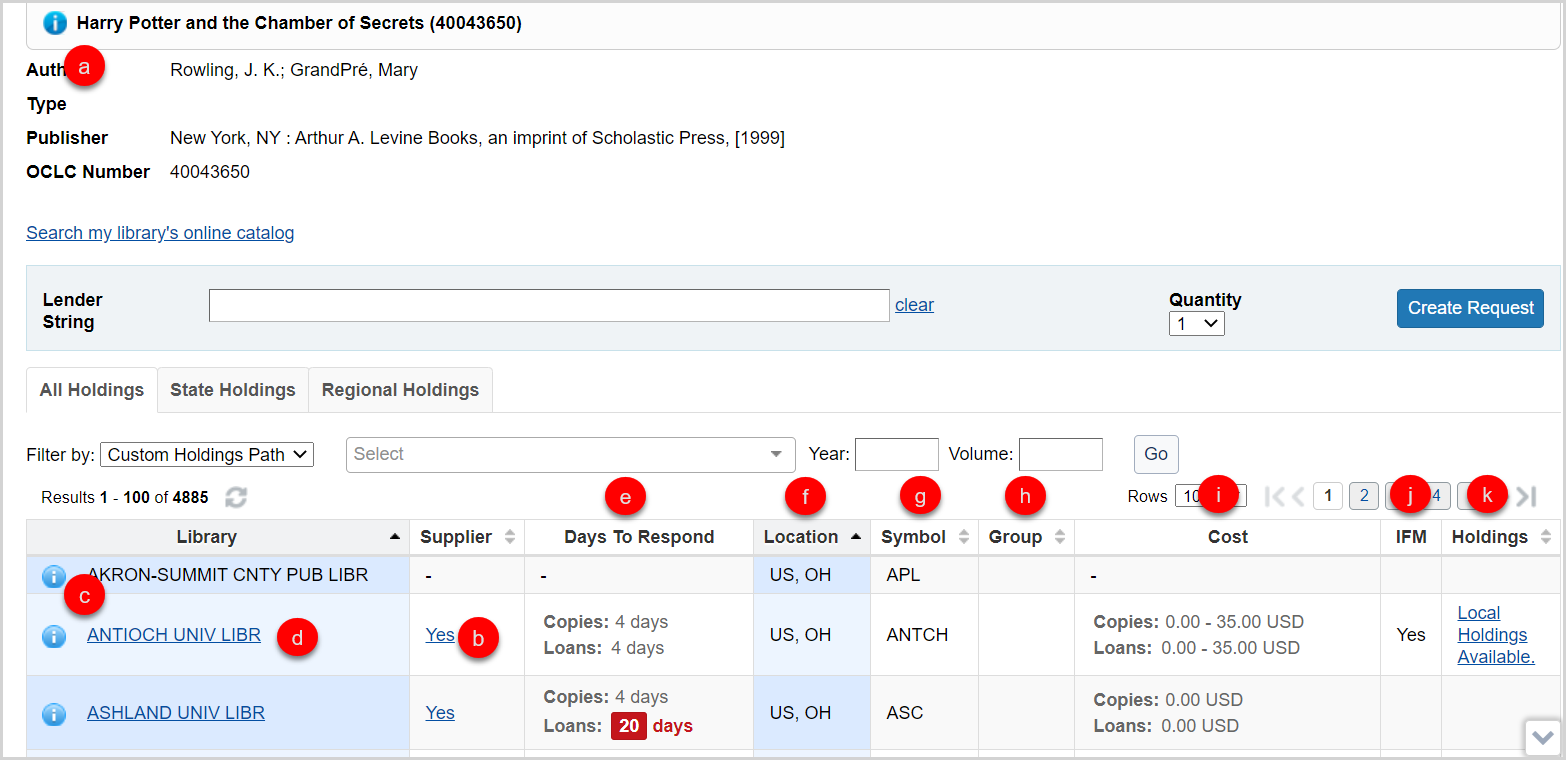
Use the Holdings screen to see information about the requested item as well as information about the available lendors. See Holdings screen for more information. Click Yes (or anywhere in the Yes box) to add a Supplier to your lender string.
Click Create Request. The request form appears.
By clicking on the drop-down button next to Send Request, you can choose to Send Request or, if you have automations configured, Send to Automation. Sending to Automation allows you to submit a request without selecting lenders on the holdings screen or applying constant data, provided your automation is set to produce the request. Requests submitted to Automation are available in the Automation Produced queue.
If the automation is set to Build Lender String or Send Request to Lenders, lenders in each Custom Holdings Group in the automation's specified Custom Holdings Path are sorted by turnaround time before being added to the lender string. Requests for articles from print serials will automatically exclude lenders who do not hold the year or volume of the requested item or who have a title-level deflection in the 008 of the LHR for the item. See Automated Request Manager for more information.
Apply your constant data record in the Request work form using the Apply constant data drop-down list. Data in a field of a constant data record will always overwrite the value shown in the request; however, pre-existing patron data will not be overwritten. When a different Constant Data is applied to a record, the fields are briefly highlighted in green as a visual indicator of the change.
Nel modulo di richiesta, fornire una data Necessario prima del (obbligatorio).
Under Borrowing Library, the Address field is required for both Shipping and Billing.
Under Lending Libraries, lender policies are listed for any lenders you chose on the Holdings screen. To add more lenders, type the institution symbol(s) of up to 15 of your preferred lender(s) in the Lender String field, separated by commas.
Optional. Provide Patron information.
If applicable, direct notes and supplier history, including reasons for no, will appear under Request History after the request is sent.
Click Send Request if the request is complete. A confirmation message appears and the request appears under the category Borrowing Requests > Produced > Awaiting Response. If you wish to save the request to submit in the future, click Save For Review.
Click Request ID in the confirmation message to search for that request ID number.
The request is re-displayed.
Holdings screen
Display holdings
To display holdings, use one of the following options:
Click State Holdings, Regional Holdings, or All Holdings.
State Holdings: Holdings within your state displayed in alphabetical order by institution name.
Regional Holdings: Holdings from states or provinces that border your state. Bodies of water are not considered when determining borders. Your institution's state or province is listed first, followed by other states or provinces in alphabetical order.
All Holdings: Your institution's state or province is listed first, followed by other states or provinces in alphabetical order.
Note: A line separates holdings for each state and province. Within each state or province, holdings are listed alphabetically by institution name
Note: The Year and Volume filters apply to the selected path or profiled group when creating a copy request for an article from a journal/magazine.
On the Holdings screen, you have several options:
Hover your cursor over the information icon () next to the title of the requested item to see brief bibliographic data.
Click Yes (or anywhere in the Yes box) in the Supplier column to add a Supplier to your lender string.
Once a lender has been added to the lender string, the hyperlink in the Supplier column will no longer be clickable. If a lender is removed from the lender string, your ability to click on Yes in the Supplier column is restored. This selection status will be maintained as you move through all holdings lists.
Yes displays if the library is a current supplier. If they are not, a dash displays in the Supplier column.
Fare clic sull'icona delle informazioni () accanto al nome della biblioteca per accedere alla directory dei criteri OCLC e confermare i criteri di una biblioteca. La OCLC Policies Directory per la biblioteca che effettua il prestito si aprirà in una nuova finestra.
Click the library name to go to the library’s online catalog.
The following must be entered in the Online Catalog section in order for the OPAC link to resolve: Online Catalog Direct to ISBN, Online Catalog Direct to ISSN, or Online Catalog Direct to OCLC Number.
View suppliers’ Days To Respond. The Days to Respond indicates the number o fdays the library needs to respond to copy and loan requests.
If an item is Held by your library, you will see the icon at the top of the Holdings screen, indicating that your library has a holding set on that item in WorldCat. You will also see this icon on the top of the Request work form.
View the suppliers Location, which displays abbreviations for the country, and state or provence.
View the institution's OCLC Symbol.
The Group column Group column populates when you filter by a Custom Holdings Path in order to show which of your Custom Holdings Groups contains a potential lender.
La colonna Costo indica quanto addebitato dalla biblioteca per copie e prestiti immessi in OCLC Policies Directory.
The IFM column will indicate Yes if the library participates in Interlibrary Loan Fee Management.
View suppliers' Holdings information. This data is populated from the lending library's local holdings record or knowledge base holdings. If the information has been provided by the library, the column will display Local holdings available or a summary statement of specific volumes and issues held.
Click on the text in the column to view additional holdings details.
The resulting Holdings screen will list the Collection and Coverage for the knowledge base holding.
Local Holdings Records will list the Format, Location, and Holding information.
The coverage information displayed in the Holdings information sometimes comes from the embargo_info field of the KBART file in the WorldCat knowledge base. See Embargo and moving wall of coverage for more information.
Note: The citation information for copy requests will display at the top of the Holdings screen and will remain as you scroll through potential lenders. Compare the lenders holding information in the Holdings column to the citation information of the copy request to be sure the lender has the exact volume needed to fulfill the request.
Create a request from an existing request
È anche possibile creare richieste accedendo a una richiesta esistente con uno dei seguenti stati.
Conditional
Considerando
Condizioni accettate
Inviato
Non ricevuto
Completato
Chiuso: Qualsiasi disposizione
Non evasa
Scaduto
Per creare una richiesta da una richiesta esistente:
Fare clic su uno degli stati sopra elencati, nella home page del prestito interbibliotecario o sulla barra di navigazione a sinistra. Viene visualizzato un elenco di richieste con lo stato specificato.
Nota: le richieste con stato inviato o in esame sono disponibili nelle intestazioni In attesa di risposta e Automazione prodotta.
Fare clic sull'ID richiesta dell'elemento che si desidera utilizzare per creare una richiesta. Verrà visualizzata la schermata dei dettagli della richiesta.
Fare clic sul pulsante Nuovo nell'angolo in alto a destra della richiesta. Un nuovo modulo di richiesta aperto, precompilato con le informazioni della richiesta originale.
Confermare che le informazioni corrispondano e apportare le modifiche necessarie.
Fare clic su Salva per revisione. Nella parte superiore della pagina viene visualizzato un messaggio che informa che la richiesta è stata creata correttamente con un ID richiesta collegato a caldo.
Modifica richieste di prestito
In some cases, it is possible to edit requests once they have been submitted. Following are scenarios where editing is currently allowed.
Note: Editing is not allowed on closed requests.
New For Review requests
Edit bibliographic data via WorldCat:
Navigate to Borrowing Requests > New For Review.
Click the request ID to open the request.
Click the magnifying glass icon, next to the Title, Author or standard number fields, to search WorldCat via Discover items.
Click the item's title, then click Apply data on the bibliographic record. Alternatively, click a link to holdings, or use a Custom Holdings Path or OCLC profiled group. Then click Update request on the Holdings screen. A confirmation message appears and the request is updated.
Custom Holdings Paths which contain Profiled Groups can only be completely applied via automations configured in the Automated Request Manager. If the Custom Holdings Path has been manually applied, a warning appears. To build a partial lender string from the current Custom Holdings Path that does not include symbols from the Profiled Group, click OK. Click Cancel to close this window and either manually route this request to automation or select a different Custom Holdings Path.
Send items through Automation:
Provided you have automations configured, you may send requests through Automation. This option is available for any borrowing request that has not yet been submitted to lenders.
Navigate to Borrowing Requests > New For Review.
Click the request ID to open the request.
Click on the drop-down button next to Send Request and choose to Send to Automation. If the request is produced with automation, it will appear in the Automation Produced queue. If it is not produced, it will remain in the list for staff review. You can check the Request History to see why it could not be produced, make further changes, and send to automation again if appropriate.
Add lenders based on holdings:
Navigate to Borrowing Requests > New For Review.
Click the request ID.
Click the View Holdings link to open the Holdings screen.
Click Yes in the Supplier column to add a lender. The lender is added to your Lender String.
Click Update request.
Produced requests
You may edit a Produced request that has not yet shipped by a lender in the following queues:
Awaiting Response
Automation Produced
Conditional
Link a patron to the request (Tipasa only)
Nel menu Utente, aggiungere l'utente appropriato e collegarsi al suo account Tipasa per consentire loro di ricevere notifiche e-mail e tenere traccia della richiesta in Il mio account.
Dalla richiesta di prestito:
Sotto l'utente verrà visualizzato un triangolo arancione con il messaggio utente non collegato. Aggiungere l'utente appropriato e collegarlo al suo account Tipasa per consentire all'utente di ricevere notifiche e-mail e tenere traccia della richiesta in Il mio account.
Immettere il nome dell'utente o l'ID lettore e utilizzare la lente di ingrandimento per cercare il record utente di Tipasa.
Dopo aver identificato l'utente corretto, fare clic sul nome a cui è collegato.
Fare clic sul pulsante Applica i dati dell'utente allarichiesta ILL. I dati dell'utente vengono applicati alla richiesta.
I seguenti dati utente vengono applicati alla richiesta se sono disponibili nel record utente:
ID lettore
Nome
Phone
E-mail
Indirizzo
L'indirizzo verrà compilato solo se non è presente un numero di notifica SMS o un indirizzo di notifica e-mail nel record utente.
Luogo di ritiro
Create requests
Patrons can use the patron request forms to request interlibrary loans.
Use the WorldShare ILL Request form to configure and customize elements of the form for your library users and provide access from any discovery services and request any item via WorldShare ILL. Requests submitted via the form can be automatically routed to the automated request manager.
You may search for items using Discover Items, then click Create Request on the desired result to open a request form with the details from the result. Click Create Request from the Borrowing Requests queue to produce a blank form.
To create a request:
Type the details of your request in the fields provided.
(Optional). To locate citation information, search for Article/Chapter title or Title using the "Search Google Scholar", "Search Google Books", or "Search Google" links located to the right of these fields.
(Optional). Enter a PMID and use the magnifying glass to retrieve citation information from PubMed. If the citation information is correct, select Apply to request to apply the PubMed citation information to the request.
Choose the request Type and Format.
Provide a Needed before date.
Apply your constant data record.
Provide a lender in the Lender string.
Click Send now. A confirmation message appears and the request appears under the category Borrowing Requests > New For Review.
Optional. Select Send to automation from the Send now drop-down to send the request through automation. Refer to Automated Request Manager for more information.
Click Borrowing Requests from the left navigation bar. The list of Borrowing categories expands.
Click New For Review.
Click your new request ID number.
In the new request screen, click Send now. A confirmation message appears.
Create borrowing requests using Discover Items
You can search for items and create a request under Discover Items.
To discover items and create requests:
Click Discover Items in the left navigation. When you open the Discover Items tab, an Advanced Search form also opens in the main panel of the screen. See Advanced search for additional information about this function.
For a basic search, choose where you would like to search and the type of search from the drop-down lists at the top of the tab.
Type your search terms in the box provided.
Click Search. Matching results appear, along with holdings display options. When you click Search, the Advanced Search form collapses at the top of the screen. Click Advanced Search to expand or collapse the form.
On the Results screen, you may search or view items using one of the following options:
Hover your cursor over the information icon () next to the title to see brief bibliographic data.
If available, click the View Now link for open access resources. The resource will open in a new window.
Search for versions with the same title and author by clicking the link. This will launch a new search based on title and author.
To submit a new request, click Create Request. The request form appears.
To display holdings, use one of the following options:
Click State Holdings, Regional Holdings, or All Holdings.
Note: Regional Holdings includes all holdings in contiguous states.
To display holdings from a Custom Holdings Path or OCLC profiled Group, select that option from the Filter by drop-down list. Click Go to see results based on the selected filters.
Use the Holdings screen to see information about the requested item as well as information about the available lendors. See Holdings screen for more information. Click Yes (or anywhere in the Yes box) to add a Supplier to your lender string.
Click Create Request. The request form appears.
By clicking on the drop-down button next to Send Request, you can choose to Send Request or, if you have automations configured, Send to Automation. Sending to Automation allows you to submit a request without selecting lenders on the holdings screen or applying constant data, provided your automation is set to produce the request. Requests submitted to Automation are available in the Automation Produced queue.
If the automation is set to Build Lender String or Send Request to Lenders, lenders in each Custom Holdings Group in the automation's specified Custom Holdings Path are sorted by turnaround time before being added to the lender string. Requests for articles from print serials will automatically exclude lenders who do not hold the year or volume of the requested item or who have a title-level deflection in the 008 of the LHR for the item. See Automated Request Manager for more information.
Apply your constant data record in the Request work form using the Apply constant data drop-down list. Data in a field of a constant data record will always overwrite the value shown in the request; however, pre-existing patron data will not be overwritten. When a different Constant Data is applied to a record, the fields are briefly highlighted in green as a visual indicator of the change.
Nel modulo di richiesta, fornire una data Necessario prima del (obbligatorio).
Under Borrowing Library, the Address field is required for both Shipping and Billing.
Under Lending Libraries, lender policies are listed for any lenders you chose on the Holdings screen. To add more lenders, type the institution symbol(s) of up to 15 of your preferred lender(s) in the Lender String field, separated by commas.
Optional. Provide Patron information.
If applicable, direct notes and supplier history, including reasons for no, will appear under Request History after the request is sent.
Click Send Request if the request is complete. A confirmation message appears and the request appears under the category Borrowing Requests > Produced > Awaiting Response. If you wish to save the request to submit in the future, click Save For Review.
Click Request ID in the confirmation message to search for that request ID number.
The request is re-displayed.
Holdings screen
Display holdings
To display holdings, use one of the following options:
Click State Holdings, Regional Holdings, or All Holdings.
State Holdings: Holdings within your state displayed in alphabetical order by institution name.
Regional Holdings: Holdings from states or provinces that border your state. Bodies of water are not considered when determining borders. Your institution's state or province is listed first, followed by other states or provinces in alphabetical order.
All Holdings: Your institution's state or province is listed first, followed by other states or provinces in alphabetical order.
Note: A line separates holdings for each state and province. Within each state or province, holdings are listed alphabetically by institution name
Note: The Year and Volume filters apply to the selected path or profiled group when creating a copy request for an article from a journal/magazine.
On the Holdings screen, you have several options:
Hover your cursor over the information icon () next to the title of the requested item to see brief bibliographic data.
Click Yes (or anywhere in the Yes box) in the Supplier column to add a Supplier to your lender string.
Once a lender has been added to the lender string, the hyperlink in the Supplier column will no longer be clickable. If a lender is removed from the lender string, your ability to click on Yes in the Supplier column is restored. This selection status will be maintained as you move through all holdings lists.
Yes displays if the library is a current supplier. If they are not, a dash displays in the Supplier column.
Fare clic sull'icona delle informazioni () accanto al nome della biblioteca per accedere alla directory dei criteri OCLC e confermare i criteri di una biblioteca. La OCLC Policies Directory per la biblioteca che effettua il prestito si aprirà in una nuova finestra.
Click the library name to go to the library’s online catalog.
The following must be entered in the Online Catalog section in order for the OPAC link to resolve: Online Catalog Direct to ISBN, Online Catalog Direct to ISSN, or Online Catalog Direct to OCLC Number.
View suppliers’ Days To Respond. The Days to Respond indicates the number o fdays the library needs to respond to copy and loan requests.
If an item is Held by your library, you will see the icon at the top of the Holdings screen, indicating that your library has a holding set on that item in WorldCat. You will also see this icon on the top of the Request work form.
View the suppliers Location, which displays abbreviations for the country, and state or provence.
View the institution's OCLC Symbol.
The Group column Group column populates when you filter by a Custom Holdings Path in order to show which of your Custom Holdings Groups contains a potential lender.
La colonna Costo indica quanto addebitato dalla biblioteca per copie e prestiti immessi in OCLC Policies Directory.
The IFM column will indicate Yes if the library participates in Interlibrary Loan Fee Management.
View suppliers' Holdings information. This data is populated from the lending library's local holdings record or knowledge base holdings. If the information has been provided by the library, the column will display Local holdings available or a summary statement of specific volumes and issues held.
Click on the text in the column to view additional holdings details.
The resulting Holdings screen will list the Collection and Coverage for the knowledge base holding.
Local Holdings Records will list the Format, Location, and Holding information.
The coverage information displayed in the Holdings information sometimes comes from the embargo_info field of the KBART file in the WorldCat knowledge base. See Embargo and moving wall of coverage for more information.
Note: The citation information for copy requests will display at the top of the Holdings screen and will remain as you scroll through potential lenders. Compare the lenders holding information in the Holdings column to the citation information of the copy request to be sure the lender has the exact volume needed to fulfill the request.
Crea una richiesta da una richiesta esistente
È anche possibile creare richieste accedendo a una richiesta esistente con uno dei seguenti stati.
Conditional
Considerando
Condizioni accettate
Inviato
Non ricevuto
Completato
Chiuso: Qualsiasi disposizione
Non evasa
Scaduto
Per creare una richiesta da una richiesta esistente:
Fare clic su uno degli stati sopra elencati, nella home page del prestito interbibliotecario o sulla barra di navigazione a sinistra. Viene visualizzato un elenco di richieste con lo stato specificato.
Nota: le richieste con stato inviato o in esame sono disponibili nelle intestazioni In attesa di risposta e Automazione prodotta.
Fare clic sull'ID richiesta dell'elemento che si desidera utilizzare per creare una richiesta. Verrà visualizzata la schermata dei dettagli della richiesta.
Click the More Actions button and select New request. A new request form opens, pre-populated with the information from the original request.
Confermare che le informazioni corrispondano e apportare le modifiche necessarie.
Click Save for review. A message that you have successfully created the request will appear at the top of the page with a hot linked Request ID.
Modifica richieste di prestito
In some cases, it is possible to edit requests once they have been submitted. Following are scenarios where editing is currently allowed.
Note: Editing is not allowed on closed requests.
New For Review requests
Edit bibliographic data via WorldCat:
Navigate to Borrowing Requests > New For Review.
Click the request ID to open the request.
Click the magnifying glass icon, next to the Title, Author or standard number fields, to search WorldCat via Discover items.
Click Apply data to request on the bibliographic record. Alternatively, click a link to holdings, or use a Custom Holdings Path or OCLC profiled group. Then click Update request on the Holdings screen. A confirmation message appears and the request is updated.
Custom Holdings Paths which contain Profiled Groups can only be completely applied via automations configured in the Automated Request Manager. If the Custom Holdings Path has been manually applied, a warning appears. To build a partial lender string from the current Custom Holdings Path that does not include symbols from the Profiled Group, click OK. Click Cancel to close this window and either manually route this request to automation or select a different Custom Holdings Path.
Send items through Automation:
Provided you have automations configured, you may send requests through Automation. This option is available for any borrowing request that has not yet been submitted to lenders.
Navigate to Borrowing Requests > New For Review.
Click the request ID to open the request.
Click on the drop-down button for Send now and choose to Send to automation. If the request is produced with automation, it will appear in the Automation Produced queue. If it is not produced, it will remain in the list for staff review. You can check the Request History to see why it could not be produced, make further changes, and send to automation again if appropriate.
Add lenders based on holdings:
Navigate to Borrowing Requests > New For Review.
Click the request ID.
Click the View Holdings link to open the Holdings screen.
Click Yes in the Supplier column to add a lender. The lender is added to your Lender String.
Click Update request.
Produced requests
You may edit a Produced request that has not yet shipped by a lender in the following queues:
Awaiting Response
Automation Produced
Conditional
Link a patron to the request (Tipasa only)
Nel menu Utente, aggiungere l'utente appropriato e collegarsi al suo account Tipasa per consentire loro di ricevere notifiche e-mail e tenere traccia della richiesta in Il mio account.
Dalla richiesta di prestito:
Sotto l'utente verrà visualizzato un triangolo arancione con il messaggio utente non collegato. Aggiungere l'utente appropriato e collegarlo al suo account Tipasa per consentire all'utente di ricevere notifiche e-mail e tenere traccia della richiesta in Il mio account.
Immettere il nome dell'utente o l'ID lettore e utilizzare la lente di ingrandimento per cercare il record utente di Tipasa.
Dopo aver identificato l'utente corretto, fare clic sul nome a cui è collegato.
Fare clic sul pulsante Applica i dati dell'utente allarichiesta ILL. I dati dell'utente vengono applicati alla richiesta.
I seguenti dati utente vengono applicati alla richiesta se sono disponibili nel record utente:
ID lettore
Nome
Phone
E-mail
Indirizzo
L'indirizzo verrà compilato solo se non è presente un numero di notifica SMS o un indirizzo di notifica e-mail nel record utente.

 ) next to the title to see brief bibliographic data.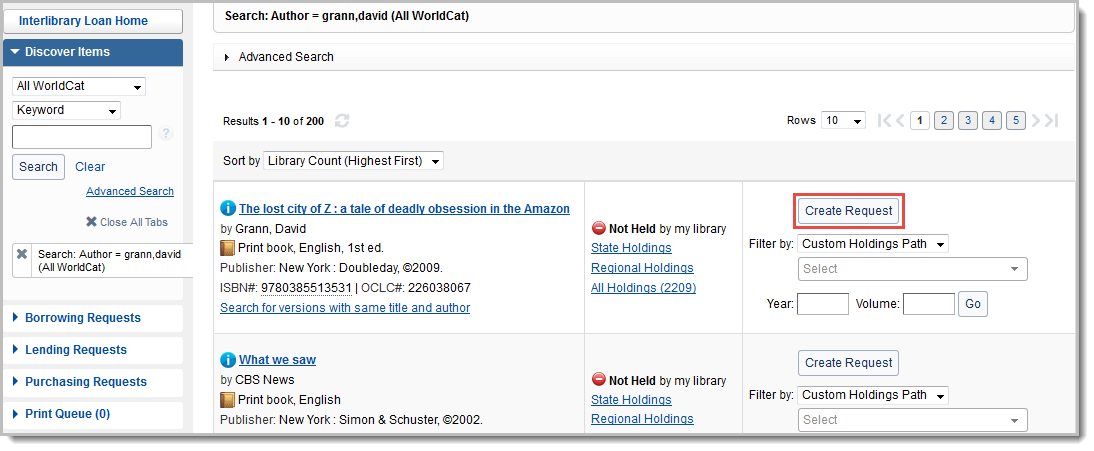


 ) next to the title of the requested item to see brief bibliographic data.
 icon at the top of the Holdings screen, indicating that your library has a holding set on that item in WorldCat. You will also see this icon on the top of the Request work form.