3. Modificare l'etichetta del dorso
Modifica dell'etichetta del dorso
Nota:
- Le modifiche apportate a un'etichetta del dorso non influiscono sulle informazioni del record e vengono visualizzate solo nell'elenco di stampa delle etichette.
- Le opzioni di formato dell'etichetta selezionate nell'Editor etichette (carattere, dimensione, stile, interlinea, ecc.) sono specificate all'interno di un tipo di etichetta in Le mie etichette > Modelli di etichetta.
- Nella navigazione a sinistra, fare clic su Le mie etichette > Elenchi di stampa etichette.
- Dalla schermata Elenchi di stampa etichette, fare clic sul nome dell'elenco di stampa etichette per il quale si desidera modificare le etichette.
- Nell'accordion Layout, fare clic su Modifica dell'etichetta che si desidera modificare.
- Dalla schermata Editor etichette, utilizzare la casella Modifica testo etichetta o la tabella Modifica contenuto etichetta per modificare il formato e il contenuto dell'etichetta. Le modifiche apportate appariranno automaticamente nell'area dell'etichetta di anteprima.
- (Facoltativo) Fare clic sul pulsante Aggiungi (
 ) per aggiungere un'ulteriore riga di etichetta o contenuto o fare clic sul pulsante Rimuovi (
 ) per rimuovere una riga di etichetta esistente. Se si aggiungono più righe vuote di quelle presenti sull'etichetta (in base alle sue dimensioni), alcune righe si sposteranno nell'area non stampabile.
 - (Facoltativo) Fare clic su Reimposta etichetta > Reimposta etichetta per cancellare tutti i campi e ripristinare le impostazioni predefinite dell'etichetta.
- Per salvare le modifiche, fare clic su Salva etichetta > Salva etichetta.
Oppure
Fare clic su Torna indietro > Salva.
Modifica di più etichette dorsali
Nell'Editor etichette è possibile modificare più etichette nello stesso elenco di stampa.
Nota:
- Le modifiche apportate a un'etichetta del dorso non influiscono sulle informazioni del record e vengono visualizzate solo nell'elenco di stampa delle etichette.
- Le opzioni di formato dell'etichetta selezionate nell'Editor etichette (carattere, dimensione, stile, interlinea, ecc.) sono specificate all'interno di un tipo di etichetta in Le mie etichette > Modelli di etichetta.
- Nella navigazione a sinistra, fare clic su Le mie etichette > Elenchi di stampa etichette.
- Dalla schermata Elenchi di stampa etichette, fare clic sul nome dell'elenco di stampa etichette per il quale si desidera modificare le etichette.
- Nell'accordion Layout, fare clic su Modifica sulla prima etichetta che si desidera modificare.
- Dalla schermata Editor etichette, utilizzare la casella Modifica testo etichetta o la tabella Modifica contenuto etichetta per modificare il formato e il contenuto dell'etichetta. Le modifiche apportate appariranno automaticamente nell'area dell'etichetta di anteprima.
- (Facoltativo) Fare clic sul pulsante Aggiungi () per aggiungere un'ulteriore riga di etichetta o contenuto o fare clic sul pulsante Rimuovi () per rimuovere una riga di etichetta esistente. Se si aggiungono più righe vuote di quelle presenti sull'etichetta (in base alle sue dimensioni), alcune righe si sposteranno nell'area non stampabile.
- Utilizzare i pulsanti di navigazione per passare all'etichetta successiva che si desidera modificare.
- Ripetere i passaggi da 4 a 6 finché non si sono modificate tutte le etichette desiderate nell'elenco di stampa delle etichette.
- Per salvare le modifiche, fare clic su Salva etichetta > Salva etichette modificate.
Oppure
Fare clic su Torna indietro > Salva.
Ripristino delle modifiche alle etichette
Quando si modificano più etichette nello stesso elenco di stampa, esistono due modi per cancellare tutti i campi e ripristinare le impostazioni predefinite:
- Fare clic su Reimposta etichetta > Reimposta etichetta per cancellare tutti i campi e ripristinare le impostazioni predefinite per l'etichetta che si sta modificando.
- Fare clic su Reimposta etichetta > Reimposta etichette modificate per cancellare tutti i campi e ripristinare le impostazioni predefinite per tutte le etichette modificate.
Panoramica dell'interfaccia dell'editor di etichette
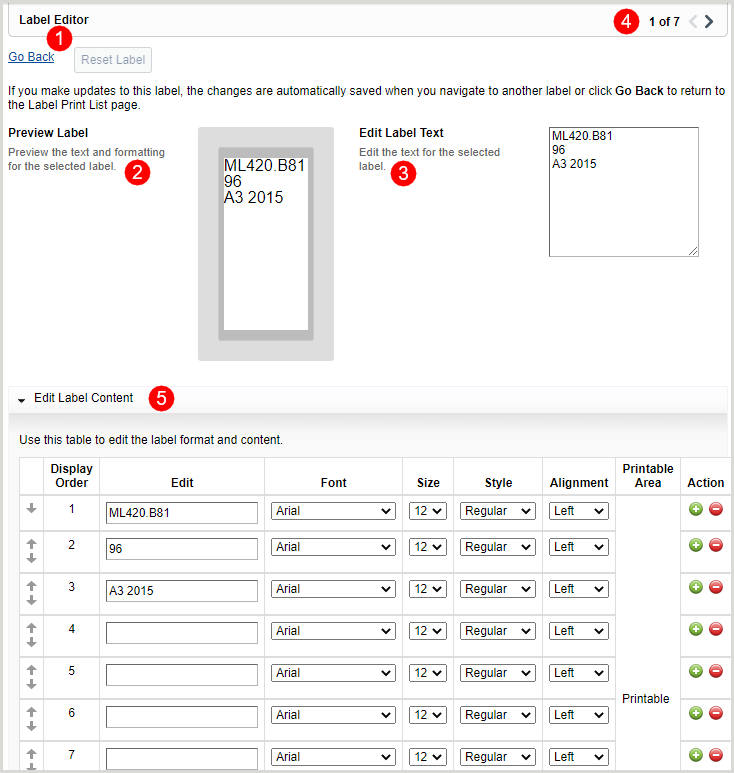
1. Azioni dell'editor di etichette
Nota: le modifiche alle etichette vengono salvate automaticamente quando si passa a un'altra etichetta dell'elenco o si fa clic su Torna indietro per tornare alla schermata Elenco stampa etichette.
Nell'Editor etichette, è possibile fare clic sul pulsante:
- Il link Torna indietro consente di tornare all'elenco di stampa delle etichette.
- Il pulsante Ripristina etichetta consente di riportare l'etichetta alle condizioni modificate in precedenza. L'opzione Reimposta etichetta è attiva solo se l'etichetta non è stata salvata.
2. Anteprima delle modifiche all'etichetta
Man mano che si modifica l'etichetta nella casella Modifica testo etichetta o nella tabella Modifica contenuto etichetta, l'etichetta di anteprima si aggiorna automaticamente per riflettere le modifiche apportate.
3. Modifica del testo dell'etichetta
La casella Modifica testo etichetta consente di modificare direttamente il testo dell'etichetta invece di utilizzare la tabella Modifica contenuto etichetta.
4. Navigazione delle etichette
Se è necessario modificare più etichette, utilizzare i pulsanti di navigazione per spostarsi tra le etichette.
5. Modifica del contenuto dell'etichetta
Utilizzare la tabella Modifica contenuto etichetta per modificare il formato e il contenuto delle etichette del dorso. È inoltre possibile modificare l'ordine delle righe all'interno di un'etichetta utilizzando le frecce su e giù (  ) nella tabella.
Opzioni di formato e contenuto dell'etichetta disponibili
| Formato | Opzioni | ||||||||||
|---|---|---|---|---|---|---|---|---|---|---|---|
| Modifica | Modifica il testo dell'etichetta per una riga specifica. | ||||||||||
| Carattere |
Nota: non tutti i font supportano set di caratteri non latini. Se il font selezionato è incompatibile con un set di caratteri non latini, l'anteprima dell'etichetta mostrerà un carattere sostitutivo (ad esempio, ⌧). La tabella seguente fornisce i font compatibili con le scritture non latine più diffuse.
|
||||||||||
| Dimensione |
|
||||||||||
| Stile |
|
||||||||||
| Allineamento |
|
||||||||||
| Azione |
|