Restituisci documenti
Schermata Restituzione
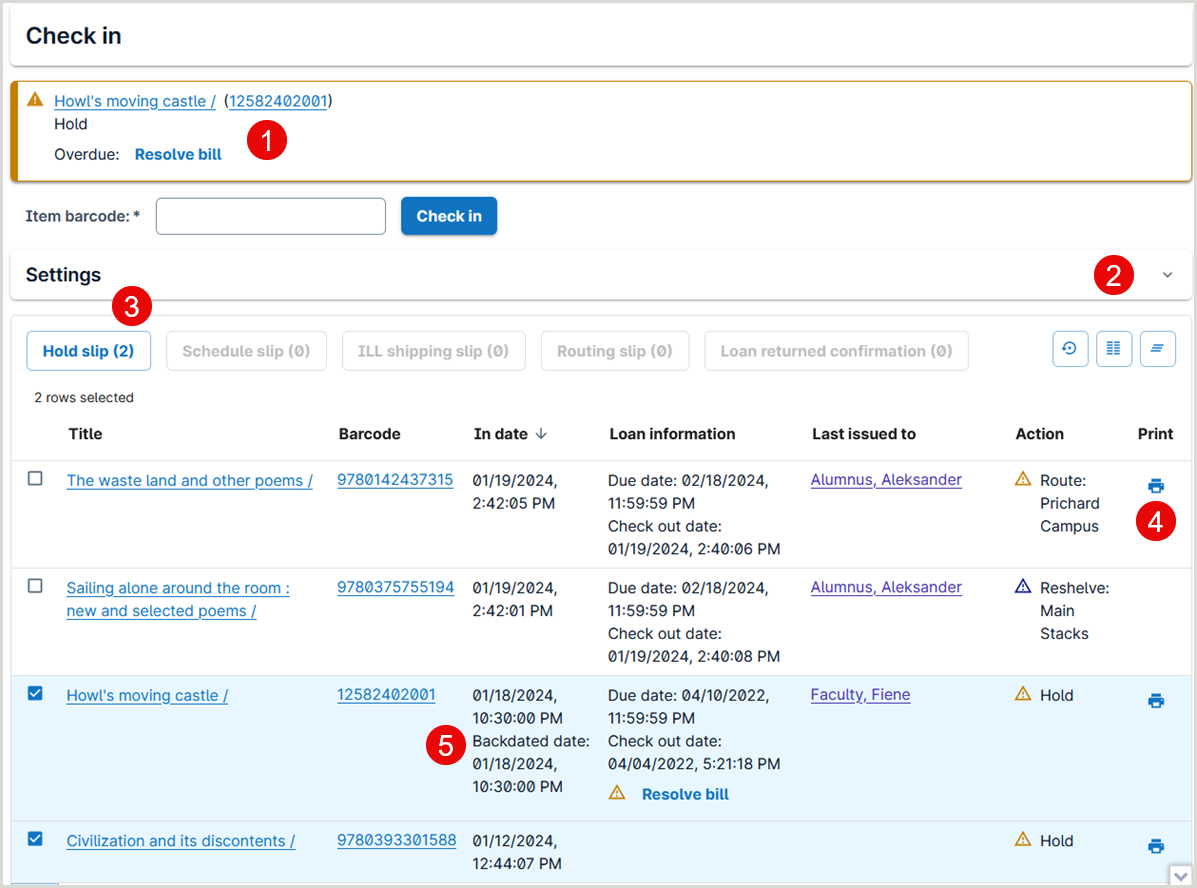
La schermata Restituzione consente di restituire elementi e controllare le preferenze di stampa, visualizzare le istruzioni per l'elaborazione degli elementi e altro ancora. Le opzioni per semplificare la lavorazione dei materiali includono:
- Visualizza gli avvisi e altri messaggi sugli elementi che sono stati restituiti.
- Scegliere di chiudere l'elenco a discesa Impostazioni per ottenere più spazio sullo schermo per il proprio lavoro.
- Selezionare gli elementi nella griglia dati (tabella) e utilizzare i pulsanti di elaborazione globale per stampare o inviare via e-mail una o più ricevute.
- Stampare le singole ricevute per prenotazioni, programmazioni e percorsi facendo clic sull'opzione di stampa per ciascuna riga pertinente nella griglia dati (tabella).
- Visualizzare la data e l'ora in cui un elemento è stato restituito insieme a qualsiasi data e ora retrodatate utilizzate durante l'elaborazione.

Impostazioni restituzione
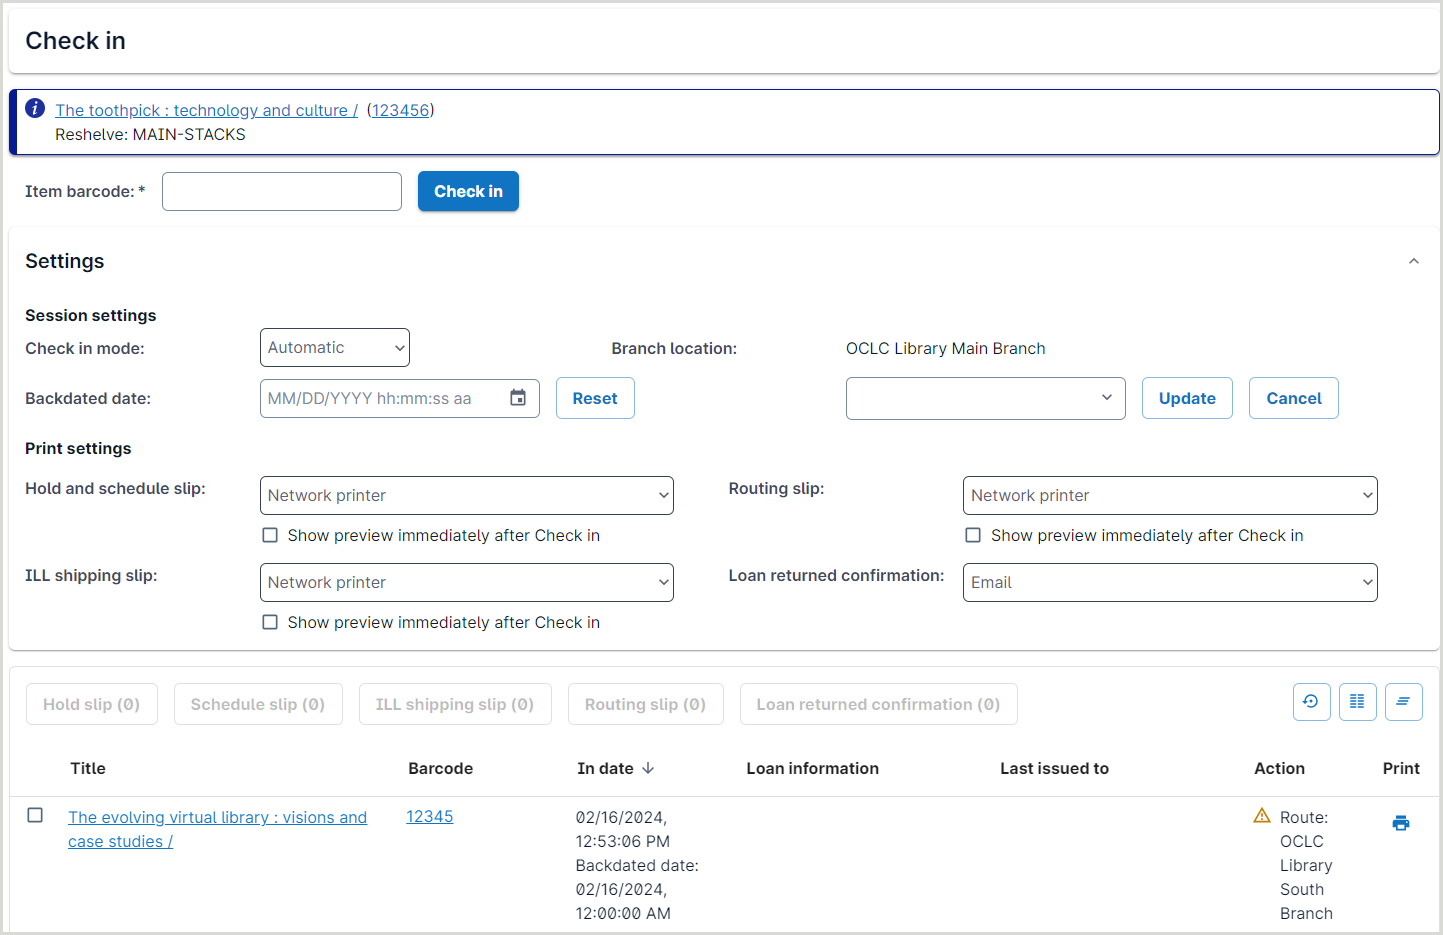
Le opzioni nell'elenco a discesa Impostazioni consentono di personalizzare le opzioni di restituzione.
Nota: le impostazioni selezionate verranno conservate solo per la sessione corrente; quando ci si disconnette o si svuota la cache del browser, il sistema non ricorderà più le scelte effettuate.

Impostazioni sessione
Utilizzare la sezione Impostazioni sessione per scegliere la modalità di elaborazione appropriata, la posizione corrente del servizio all'interno della sede e una data retrodatata per l'elaborazione dei materiali che erano in prestito, ove appropriato.
Nota: le impostazioni della sessione selezionata verranno conservate solo per la sessione corrente; quando ci si disconnette o si svuota la cache del browser, il sistema non ricorderà più le scelte effettuate.
Le impostazioni includono:
Modalità Check in
Selezionare la modalità di elaborazione appropriata. Le opzioni includono:
- Automatico (predefinito): utilizzare per transazioni normali. La modalità automatica esegue tutte le normali azioni associate alla restituzione (rimuove l'elemento dal record dell'utente, attiva una prenotazione, invia l'elemento a un punto di raccolta o ritiro, ecc.).
- Restituzione non in prestito: utilizzare per restituire elementi che sono stati utilizzati, ma non presi in prestito (elementi della collezione di consultazione, elementi che sono riservati o elementi trovati in una sala di lettura). Questa modalità aggiorna il conteggio delle pubblicazioni periodiche dell'elemento nella schermata delle statistiche dell'elemento.
- Inventario: Si usa quando si effettua un inventario (ad esempio, si esegue una lettura degli scaffali e si scansionano i codici a barre degli articoli presenti). Questa modalità aggiorna il conteggio degli articoli inventariati e la data dell'ultima inventariata nella schermata delle statistiche dell'articolo. Per ulteriori informazioni, consultare la sezione Inventario.
- Elimina prenotazione: consente di eliminare la prenotazione su un articolo che si trova sullo scaffale di ritiro, ma non è ancora scaduto. Questa modalità consente di ritirare l'elemento e annullare la prenotazione per l'utente a cui era stato notificato che l'elemento era pronto per il ritiro.
Localizzazione sede
Selezionare la posizione corrente del servizio all'interno della propria sede. Facoltativamente, aggiornare le ultime statistiche di un elemento visto per specificare una posizione all'interno di una sede durante il check-in dell'elemento nel sistema. Il sistema continuerà a soddisfare le prenotazioni e le programmazioni degli articoli se l'articolo viene restituito alla sede di ritiro.
- Utilizzare il pulsante Modifica posizione per selezionare la sede appropriata dall'elenco a discesa risultante. Selezionare Aggiorna per aggiornare la posizione.
- Se la biblioteca ha più di un punto di ritiro per filiale, si consiglia di effettuare il check-in degli articoli nel punto di ritiro specificato per garantire che il rapporto Clear Hold Shelf possa elencare gli articoli in ogni punto. Il rapporto Clear Hold Shelf fornisce l'ultima posizione di ciascun articolo.
- Nota: il check-in di un elemento da qualsiasi altra interfaccia imposta le statistiche di ultima visualizzazione dell'elemento solo a livello di filiale. Qualsiasi posizione di filiale o valore di testo libero registrato in precedenza verrà rimosso. Questo include il check-in e l'estrazione degli articoli con Digby, la restituzione dei libri con RFID e le macchine di smistamento.
- Qualsiasi utente con un ruolo Circolazione o Studente lavoratore può impostare una posizione sede dalla schermata Restituzione. Per impostazione predefinita, viene visualizzata la sede corrente. Per specificare una posizione più esatta per la restituzione, utilizzare il pulsante Modifica posizione per aprire le opzioni di modifica.
Data retrodatata
Selezionare una data retrodatata per l'elaborazione dei materiali, ove appropriato. Selezionare Modifica data per modificare le informazioni sulla data per il check-in.
- La retrodatazione della data di consegna degli articoli eliminerà le multe maturate dal cliente dopo tale data. Tra i motivi che giustificano la retrodatazione vi sono le emergenze della struttura, le chiusure per maltempo o i giorni di servizio del personale.
- Nota: per evitare di dover retrodatare la data di check-in, inserire gli orari regolari e speciali nel Registro WorldCat. Per ulteriori informazioni, consultare gli orari di apertura.
- Per retrodatare per elementi in elaborazione:
- Fare clic sul pulsante Modifica data.
- Selezionare la data desiderata.
- Opzionale. Selezionare l'intervallo di tempo per il nuovo orario di restituzione.
- Click OK.
-
Impostazioni di stampa
Controllare come vengono generate le ricevute con la sezione Impostazioni di stampa. Scegliere opzioni diverse per ogni tipo di ricevuta. Ad esempio, selezionare la stampa di rete per le ricevute di prenotazione e programmazione mentre si inviano le schede di circolazione a una stampante per POS e si utilizza l'e-mail per le conferme di restituzione del prestito (precedentemente chiamata Ricevuta restituzione).
Nota: le impostazioni di stampa selezionate verranno conservate per la sessione successiva, indipendentemente dal computer o dal browser utilizzati.
- Se si utilizzano stampanti POS, potrebbe essere necessario selezionare la stampante POS ogni volta che si cambia workstation o si installa o si rinomina una stampante.
Selezionare per utilizzare una stampante di rete o non stampare per i moduli seguenti:
- Scheda Prenotazioni
- Scheda Transito
- Scheda spedizione ILL
Scegliere di inviare via e-mail, stampare o non stampare la conferma di restituzione del prestito.
Quando si utilizza una stampante di rete, scegliere se il sistema deve visualizzare l'anteprima di stampa modale (finestra di dialogo) subito dopo il deposito dell'elemento. Se si preferisce stampare i documenti una volta terminato il check-in di più documenti, è possibile deselezionare l'opzione Mostra anteprima subito dopo il prestito per evitare interruzioni durante la scansione degli elementi. Indipendentemente dalla selezione dell'opzione Mostra anteprima, è possibile stampare le ricevute per elementi già digitalizzati utilizzando le nuove opzioni nella griglia dati (tabella) degli elementi elaborati per stampare ricevute singole o per batch di ricevute.
- Le ricevute utilizzano l'indirizzo e-mail fornito nella scheda del cliente.
- Se non c'è un indirizzo e-mail nel record del patrono, il campo E-mail sarà vuoto. Per inviare al mecenate una ricevuta via e-mail, è necessario aggiungere il suo indirizzo e-mail al suo record di mecenate e quindi inviare nuovamente la ricevuta.
- Se il cliente desidera che l'e-mail venga inviata a un indirizzo e-mail diverso, è possibile modificare l'indirizzo e-mail nella finestra Anteprima e-mail.
- La modifica dell'indirizzo e-mail nella finestra Anteprima e-mail non modifica l'indirizzo e-mail nel record del patrono.
Per ulteriori informazioni sulle ricevute, vedere Ricevute di circolazione.
Check-in standard
- Nel pannello di sinistra fare clic su Check In.
- La modalità di controllo predefinita deve essere Auto.
- Opzionale. Impostare la posizione della filiale su un luogo di prelievo specifico. Vedere Impostazione della posizione della filiale al momento del check-in.
- Selezionare un'opzione di ricezione.
- Scansionare o inserire il codice a barre nel campo Codice a barre dell'articolo. Se si usa uno scanner, di solito legge ed elabora il check-in a ogni scansione. Se si digita il codice a barre, è necessario premere Invio o fare clic sul pulsante Check In.
- Eseguire la scansione o digitare altri elementi.
Ogni articolo viene visualizzato nell'elenco Check In, con il nome del cliente a cui è stato prestato.
Nota: la colonna Azione indica la prossima operazione da eseguire con l'elemento.
Se è stata scelta l'opzione di stampa e l'articolo deve essere trattenuto o instradato, viene stampata la distinta di trattenimento o instradamento. Se è stata selezionata l'opzione e-mail, viene visualizzata la finestra Anteprima e-mail.
(Opzionale). Fare clic su Cancella per cancellare l'elenco degli articoli restituiti dalla schermata Check In.
Come configurare le colonne
Nota: le preferenze vengono mantenute per l'account utente.
È possibile scegliere le colonne che appaiono nella schermata Check In.
- Sul lato destro dello schermo, fare clic sul pulsante Mostra colonne
 .
. - Nella finestra Mostra colonne, selezionare o deselezionare le colonne che si desidera mostrare o nascondere.
- Le informazioni sul numero di copia vengono visualizzate solo per gli articoli LHR creati o aggiornati dopo il 18 settembre 2022.
- Chiudi la finestra di dialogo facendo un clic altrove.
Guarda un video
Restituzione
Durata: 4:46
In questo video viene illustrato come effettuare il check-in dei materiali, compresa la stampa o l'invio via e-mail di una ricevuta di check-in e l'elaborazione di articoli che soddisfano una richiesta o che devono essere inoltrati a un'altra filiale.
